Thursday, April 30, 2009
A Card For Akemi
My daughter just loves coloring in stamped images! Since I've been busy making a lot of cards, I'll stamp a couple of images for her to color in beside me. After she went to bed, I decided to make a card for her. I just got these cool Anime stamps from In Style Stamps. They are really really really cute! I chose this one because her names is Akemi.. just like my daugther. Since she is also learning how to read, I wrote to her inside the card using words I know she knows. She was thrilled to be able to read the card herself!
A closer look at Akemi...
After I gave my daughter the card, she decided to make a card for me! Here's the card she made...
Can you tell she likes to use her glitter glue?
I was so touched that she wanted to make a card for me! Thank you Akemi!
If you haven't already checked out In Style Stamps, you should take a look. They have a lot of Anime stamps and even digital images you can purchase. You can even send in a photo and they'll make a custom Anime based on the photo! Isn't that cool? I'm thinking about trying it myself.
Wednesday, April 29, 2009
Under the Sea... with Anya!
Mermaid Anya has to be one of my favorite Anyas! Maybe its because The Little Mermaid is one of my favorite movies? Not sure, but she is a cutie.
Here's two versions of Mermaid Anya. I really like the first card. To me, mermaids would have green fins. Not sure why, but they just do. Even though she kind of blends in with the background paper, I like the way the colors match perfectly.
The second version is a combination of Ariel and the mermaid from Splash... OK now for some 80's trivia... what was the name given to the mermaid (aka Daryl Hannah) in the movie Splash? Answer at the end of this post. Back to my story... Her hair is reddish orange- similar to Ariel and her fins are orange like on Splash. I chose these colors because they stood out against the paper. Sometimes I like the contrasting colors instead of coordinating colors.
Supplies used:
Cardstock- Bazzil
DP- The Stamping Station
Mermaid Anya- The Greetings Farm
Happy Birthday sentiment- printed from my computer
Glitter- Stickles
Circle and Scallop circle dies- Spellbinders
Pens- Copics
Rhinestones- Hero Arts
OK now for the answer... .Madison! I think it had something to do with the street they were walking on in the movie. Another bit of useless information stored in my brain forever.
Arigato Card
Ok- I'm the first to admit that I didn't think Geisha Anya was that cute, but she is definitely growing on me. The more I create with her, the more I like her! I couldn't find any sentiment that matched this card. I really should have searched my Kanji stamps or brass stencils, but I always seem to gravitate towards my dies. So since I couldn't find anything I liked that I had, I decided to use my favorite Endless Love Sizzlits font set. To me, this font is great for a more elegant look. It works well with asian themed cards, don't ya think?
I'm still practicing my coloring with my Copic markers. My daughter thinks she's the Copic expert. She wants me to buy all the colors so she can color them into the Copic color chart. I need to take that chart with me to Honolulu this weekend (Woo hoo!) so I don't buy the same colors again.
Getting off track...
Supplies used:
Geisha Anya stamp- The Greetings Farm
Cardstock- Bazzil
Washi paper- Hanko Designs
Gold sticker paper- Dreamweaver
Endless Love font- Sizzix
Glitter- Stickles
Copic pens
Sick of Anya yet?
Are you sick of Anya yet? I'm not... but in case you are, here's a bit of a break from her.... take a look at my Ian cards!! Now I only have a daughter, so making these cards was kind of new and difficult for me... I'm used to pink and frills and glitter, etc. Not being able to use any of that was pretty hard.
This Fire Chief outfit is so cute! The circles embossing folder by Cuttlebug reminds me of firemen for some reason- don't ask me why. Or maybe it reminds me of Target??? Although its hard to see in this photo, I used the swirls embossing folder for the white paper in the background. It reminded me of smoke, so I figure it works with a fireman- right?
Here's a closer look at the Chief....
Supplies used:
Rescue Ian stamp- The Greetings Farm
Cardstock- Bazzil
Circle and Swirls embossing folders- Cuttlebug
Pens- Copics
Happy Birthday sentiment- printed from my computer
Labels 1 dies- Spellbinders
Hello Ian! That's the actual name of this stamp... I think its cute that he's giving you a flower, don't ch'ya think?
Supplies used:
Hello Ian- The Greetings Farm
Cardstock- Bazzil
Pens- Copics
Flower embossing folder- Cuttlebug
For you sentiment- Endless Love Sizzix dies
Ribbon- Bo Bunny
I miss my Stickles... Better get back to making Anyas again!
Tuesday, April 28, 2009
You So Totally Rock, Dude!
My husband and I were talking about what kind of sentiments should go on my cards... Naturally I thought "You Rock" was appropriate for this Anya card since she's a Rockstar! Then we debated about how far is too far.. he recommended, "You Totally Rock", then I said "You So Totally Rock!", then I added "Dude" and he told me that I went too far. hee hee.
Anyway, this Anya is rocking out with her pink hair and glitter highlights! I just can't resist when I make these Rockstar Anyas, it just screams Glitter to me.
Here's a closer look at Anya herself...
Supplies used:
Anya stamp- The Greetings Farm
Cardstock- Bazzil
Swiss Dots embossing folder- Cuttlebug
Labels 4 dies- Spellbinders
You Rock sentiment- printed from my computer
Glitter accents- Stickles
Crystals- Crystal accents
Copic markers
Saturday, April 25, 2009
Blog Candy Alert...
Check out Debbie's Passion for Crafts blog where you can win some AWESOME stuff! On second thought... don't enter so I have better chances of winning! Only kidding!!! Good luck!
Friday, April 24, 2009
Inspiration At Midnight
My daughter has a ballet performance coming up soon and I've been trying to figure out what to make to give all her ballet friends. I didn't want to spend too much money since there are a lot of girls in the class. Also, I was informed that it is very common to give the girls flowers after the performance. I had an idea but didn't quite know how I'd execute it, until tonight!!! Ta-Da!!! (Imagine me making spirit fingers around the fairy).
Here's a closer look...
Of course, this is just the prototype. I actually want to use the ballerina Anya stamp which I don't have yet but will hopefully get before the performance. The fairy is actually 2-sided so no matter which way you turn the flower, she's facing you. Can't wait to get the ballerina Anya so I can get this project out of the way!
Supplies used:
Fairy Chloe stamp- The Greetings Farm
Glitter- Stickles
Flower die- Sizzix
Ribbon, wire, floral tape and leaf- Ben Franklin
Flower crystal- Hero Arts
Thursday, April 23, 2009
Hello Kitty Thank Yous
Here's more of the cards I made over the weekend with my Hello Kitty Embosslits. The first two are very similar, just using different cardstock.
Supplies used:
Hello Kitty Embosslit- Sizzix
Labels #1- Spellbinders
Gold sticker paper- Dreamweaver
Crystals- Hero Arts
Swiss Dot paper- Bazzil
I just bought a Martha Stewart border punch that I really wanted to use. So I used it on some mirrored silver cardstock and it came out much nicer than I expected.
Supplies used:
Hello Kitty Embosslit- Sizzix
Carstock- Bazzil
Thank you sentiment- Sizzix Greetings set
Crystal- Hero Arts
Although this is not a Thank You card, I decided to include this on the post since its still Hello Kitty. For some reason I really like this color combination.
Supplies used:
Swiss dot paper- Bazzil
Gold sticker paper- Dreamweaver
Hello Kitty Embosslit- Sizzix
Washi paper- Paper Intelligence
Crystal- Hero Arts
And finally, my favorite of the bunch. It took a little longer to make because I had to cut out each letter, but I think it was worth it. I like this font better with the paper used.
Supplies used:
Hello Kitty Embosslit- Sizzix
Cardstock- Bazzil
Washi paper- Hanko designs
Arigato- cut from Sizzix Endless Love dies
Gold sticker paper- Dreamweaver
Wednesday, April 22, 2009
Angel Anya
There's a New Sheriff(s) in town...
Ok- that's not exactly good English, but what can I say, I'm a local girl and sometimes the pidgin just comes out! hee hee.
Anyways (more pidgin leaking out), I just LOOOOOVE these cowboy and cowgirl stamps from The Greetings Farm! I really don't know what I'll do with them since no one I know is into cowboy stuff, but who can resist???
Supplies used:
Cowboy Ian and Cowgirl Anya Stamps: The Greetings Farm
Cardstock: Bazzil
Megabilities die: Spellbinders
Pens: Copics
Howdy Partner Sentiment: Printed from my computer
Gold Glitter: Stickles
Pop Dots: All Night Media
Hope you have a "Yee Haw" kinda week y'all! (Sorry, I tried to talk cowboy, but obviously I don't know how!) All this cowboy talk puts me in the mood for some mini sirloin burgers from Jack in the Box!
Tuesday, April 21, 2009
Anya's Debut (On My Blog)
OK- I know everyone is crazy for The Greetings Farm. Franky, I didn't think they were that cute (gasp!) when I first saw them... but now I just can't get enough! Those cute kids somehow snuck in and now I can't wait to get them all! After all, who can resist Flutter Anya? She's so cute! So along with the cuties, I had to figure out how to color them in... and my current supply of coloring mediums was just not going to cut it. Now, I know everyone is using Copic pens with great results, but I was hesitant because I knew it would be good, and knew once I tried them, I would probably have to have them all!! Against my better judgement (financially, that is), I took the plunge and bought some Copics and haven't looked back! Disclaimer... I do not claim to be a Copic expert...I'm still learning, so don't laugh at my coloring! :)
Here's a close up of Flutter Anya...
Supplies used:
Flutter Anya- The Greetings Farm
Gold Glitter- Stickles
Pens- Copics!
DP- scraps from my stash
Cardstock- Bazzil
Circle and Scallop Circle dies- Spellbinders
Its your day sentiment- Sizzix Sizzlits set
Thanks for stopping by! I'll post more Greetings Farm tomorrow.
Monday, April 20, 2009
Some Of My Favorites
Hi Everyone! Here's the second installment of all the cards I've been making recently. Here's some of my favorites. I'm really digging these Hello Kitty Embosslits. I must admit that at first, I didn't really like them and preferred the regular Sizzlits instead, but now I'm hooked! All of these cards were made using the Hello Kitty Embosslits, Bazzil Cardstock and Hero Arts Bling.
I like this first card because of all the hearts! The heart Cuttlebug Embossing Folder is one of my favorites. I don't use it that much since its normally saved for family members. Finally, the large heart was cut using Spellbinders.
The next two cards are pretty much the same thing, just using different cardstock. The first one was made using some scraps of one of my favorite Imaginisce designs. One of my favorite color combinations is light green and pink... not sure why but I think it works. The heart shaped flower die is by Sizzix and the inside of the flowers were embellished with Stickles.
This next card is the same design but no DP. I wanted the Hello Kitty to stand out, so this time I mounted everything on black. The black cardstock was embossed using the Swiss Dots Cuttlebug Embossing Folder to give it some texture. Finally, a scrap piece of ribbon was used to accent the bottom of the card.
Stay tuned for more posts!
Sunday, April 19, 2009
Busy Weekend, Busy Life!
In addition to my full time job, I have suddenly found myself very very busy with non-work stuff. My daughter's ballet performance is next month, along with her pre-school graduation and birthday. Since all that is happening, my mom is visiting- which means we have to clean the house!! Before that even happens, there's Mother's Day, a club project, another baby shower, and a trip to Honolulu. In between, there are extra practices, picture taking, etc for the ballet performance. Yikes!!!! I think there's too much on my plate right now.
Anyway, busy schedules call for good planning. Since every minute counts, I had to start working on something... so I decided to make some cards for our club project. I guess I work well under pressure cause I didn't know I could make 13 cards in 2 nights! In addition to cards, I also decorated some gift bags. To keep it interesting and not clog up my computer, I'll post a few at a time...
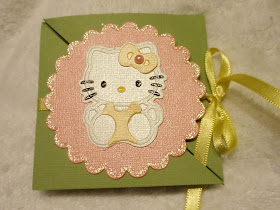
The first card was actually made before the weekend even began I wanted to try out my new Martha Stewart Ice Cream Cone Punch. It came out really cute. I also bought the cupcake punch, but haven't had a chance to use it yet. The Hello Kitty Sizzlit I used was the one where she's holding the flower. I thought it was the perfect pose for her to hold a tower of ice cream!
Other supplies used:
Cardstock- Bazzil Bling, Swiss Dots
Happy Birthday- Sizzix Sizzlit set
Here's a close up of the card.
The next card was made using my new Imaginisce stamps. I'm not sure why, but I really liked the chick and the "So tweet" saying. I just thought it was cute... maybe it was because it was around Easter when I picked it up. Anyway, they were pretty reasonable, so I picked them up at Island Scrapbooking. Maybe I just needed a Hello Kitty break.
Other supplies used:
Cardstock: Bazzil Bling, Swiss Dots
Stickles
Stampin up watercolor pencils and blender pens (to color the chick- this was pre-Copics).
Arch border punch- Martha Stewart
Don't laugh... here's a close up of my chick. I am not a real good colorer- never was.. even as a child. Anyway, I used my Stampin up watercolor pencils as best I could and blended them with the blender pens. I recently purchased some Copic pens and am trying to learn how to use them. If you have any tips, please share! You'll see my Copic coloring in another post.
Back to Hello Kitty. This last card was made using my new Scor-Pal. On the Scor-Pal website, there are many instructions available to make cool cards, boxes, bags, etc. Anyway, this one is called a tri-fold card. I thought it was a neat design- though the finished size is kinda small. I was hoping to put a gift card in it, but I think it won't fit. I still like it since its different.
Other supplies used:
Hello Kitty Embosslit- Sizzix
Cardstock- Bazzil, Bazzil Bling
Pearl accent- Hero Arts
Glaze Pens- Sakura
Ribbon- Ben Franklin
Stickles
Have a great week!
Tuesday, April 14, 2009
Princess Calendar
I'm soooooo late in making this calendar for my friend Ella. She wanted one for her granddaughter who loves Princesses. Since the first few months of 2009 is gone, I decided to make the calendar starting from July 2009 to June 2010. That way, she can still make use of it. Her granddaughter's favorite color is purple, so I tried to incorporate it as much as I could. Princess stickers were by E.K. Success and DP was scraps- mainly from DCWV and Lasting Impressions. Regular cardstock is by Bazzil and DCWV. Months were cut using Sizzix month sizzlits set. Scallop circle die used is by Spellbinders and cut from Swiss Dots paper. I printed the year on cardstock and cut it from the circle Spellbinders die. Dotted Ribbon was purchased from Big Island Packaging. Stickles was used to accent plain papers (hard to see from these photos, I know).
My Cute Stamps!
While browsing on another blog, I stumbled upon My Cute Stamps blog and website. These are really cute! I like the Jelly Beans stamp set a lot.. and guess what? They are giving one away! Check out their blog candy here. You can also submit to be on their Design Team- so check it out.
Sunday, April 12, 2009
Recyle Bag Tutorial
I received a question on how to make the recycle bags from Linda. I used to sew but those days are gone... I don't think my sewing machine even works anymore! Anyway- I wanted to embellish my recycle bags and researched using fabric on the Sizzix website. I was happy to find that no sewing was required! Here's what I did:
Supplies used:
- Fusible web (No Sew type)- comes in a roll or small sheets that are folded. Follow directions on the package.
- Fabric- if you are using white fabric, make sure its a thicker type since you can sometimes see through it- especially if you are using a black bag.
- Iron
- Embellishments- buttons, fabric paint, crystals (used with fabric glue), etc.
- Recycle bag
1. Iron fusible web to BACK of fabric that you want to use. Paper side should be facing you.
First, cut fabric to fit die.
Then place fabric piece with fabric side down on die-otherwise your image will be cut backwards. You may want to do this, so just keep it in mind.
Here's what your Hello Kitty will look like- same as if you cut it with paper. Pop out the eyes and nose.
3. Just as you would with paper- cut additional pieces in different colors for layering.
4. Peel off paper from back of die cut and position onto base piece. I normally iron on the base piece first then add the layers to the piece- but do what's most comfortable for you. If you are making a Hello Kitty bag here's what I did for the face- Since the bag was black, I didn't need to do anything for the eyes (just popped them out). For the nose, I ironed on a small yellow piece of fabric first and then layed the head over it, positioning the cut out nose over the yellow.
Peel off the backing...
Here's the piece I used for the nose. I ironed it on first then positioned the head over the yellow so that it covered the nose hole. (can't seem to rotate this photo- sorry!).
Iron on Hello Kitty head so that nose opening is over the yellow fabric.
5. After you iron on all the pieces, you can embellish the bag with crystals (adhered using fabric glue), fabric paint or buttons. For Hello Kitty bags, I used black fabric paint for the whiskers.
I also used a clear glitter fabric paint to accent the bow.
Here's a close up of the bow before it dries. Don't worry, it will dry clear.
I added the Hello Kitty phrase to the bag. Later on, I'm going to cut flowers, etc. and decorate the bag more. You can stop here... just depends on how you want your bag to look!
Linda- hope this is helpful to you! Not much different from making regular die cuts from your Sizzix- just a couple extra steps of adding the fusible web. Have fun making them! Please let me know how your bags turn out! I'd love to see them!