Monday, November 29, 2010
Buried Treasure
Once upon a time I used to sew! Can you believe it? Its been about 10 years but feels like eons ago. Anyway, I'm busy getting ready for my upcoming craft fair this Saturday (which is why I haven't been posting much) when I suddenly remembered that I might have some old quilt stuff that I made years ago. I didn't think I had any quilts leftover, but I thought I might have some leftover pillow covers. We dug in the closet that we never go into, and found this buried treasure! I even had some with pillows inside. The good thing about them is you can take off the pillow case and wash it.
Felt like finding long lost friends! I was happy to find these since I never did make Akemi a Japanese girl quilt. I will save some of these for her.
Here's the kimono design too.
So, I guess these will also go out at the fair to sell. Hope to see you there! Stay tuned.. my brother is sending me more craft items to sell- all the way from LA! When I get them I'll post them so you can see how talented my brother is too.
Monday, November 22, 2010
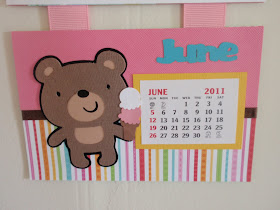
Create A Critter Calendar
I've been dying to make a Create a Critter calendar and its finally done! I have a couple more but won't be sharing them since they look similar- just different papers used. If you've seen my work before, you know that I LOVE LOVE LOVE Doodlebug Designs paper. It's so cute and happy looking and just my style. I thought the critters would pair well with the Doodlebug papers. I also used a lot of post-it paper- Thank You 3M for making this paper for Cricut users!!! It totally cuts down on my assembly time!! Thanks to Teri for telling me about it... I'm hooked!
Oh yah- all punches are MS Crafts and all regular cardstock is Bazzil. Hope you like it!
Sunday, November 21, 2010
Butterfly Calendar
Found this paper stack I bought awhile ago and decided to make a calendar with it. I love pink and brown together, plus it had butterflies, plus it was glittery! Yay- some of my favorite things all rolled together in one! Kept everything fairly simple and just added some punch accents here and there. Hope you like it!
Got a little scared when I went to the Egplants Craft Fair last night. Everyone I ran into said they were coming to the craft fair. I'm glad the word is getting out via word of mouth and the flyers we made. Just getting a little nervous now because I need to make more stuff! OK- back to work.
Saturday, November 20, 2010
Last Christmas Card Class
Amidst all the craziness of my upcoming craft fair, I managed to squeeze in the Last Christmas Card Club class of the year. I was inspired by the Chirstmas Stampin All Year Round concept and came up with the idea for a series of Christmas Card Classes that started in the summer. The focus was on simple Christmas cards and projects and we'd make between 3-5 projects per class. Keeping the class projects simple was great for beginners and it also brought a lot of us back to basics in card making. In the first class, I polled the students to find out what kind of projects they wanted to do and feedback was they didn't want to stick to just cards. So one class focused on tags, one on gift card holders and the rest were cards.
For our last class, I was inspired by all the cute Hero Arts stamps in the store. Earlier I shared with you a gold version of this embossed wreath stamp, but I couldn't do gold this time, so I went with silver and it came out just as nice.
This next card is actually not the finished sample we made. I forgot to take the picture of the revision I did- just added the sentiment to the bottom of the card. Oh well, you'll have to use your imagination. Found these tiny jingle bells and thought it would be a cute accent. I also found this cute paper by Jillybean in the store that reminded me of Christmas candy and thought it would be perfect for this card.
This Christmas tree punch art card was inspired by all you bloggers out there. I've seen several versions of this card before so I CASE'd them for the class. We built the tree using 6 heart punches. The white was used to simulate snow to coordinate with the white polka dots on the Doodlebug paper. Since we were using hearts for the tree, I thought it would be cute to use hearts for the ornaments too.
This last card is my favorite of the bunch. It took the most time to complete because we had to emboss 3 of each tree for a total of 9 trees. The time saving part was that we embossed it on green cardstock, so no coloring was needed. My students always request no coloring, so I have to find ways to reduce the amount of coloring in the class.
I also stamped the background using the musical note background cling stamp by Hero Arts. I was so happy Hero Arts came out with a cling of this as I was trying to find a large musical note background stamp. Yay! Stamped it using my Antique Linen Distress Ink- love how it came out- very subtle but enough to make it interesting. Plus one of the trees has musical notes on it, so I thought it coordinated well.
Finally, I decided to thank the students by doing a bonus project. They were all so nice to sign up for my class with no class sample to look at beforehand, so I thought I'd reward them by showing them how to make this simple A2 box. Found the instructions on Splitcoast Stampers here..
We added a bellyband using the MS Snowflake punch since it coordinated well with the snowflake paper.
This class was so much fun to host each month! I'm thinking of doing this class series again next year starting in the summer.
Thursday, November 18, 2010
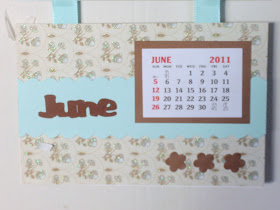
Floral Calendar
Happy Thursday! I'm so happy tomorrow is a furlough for me- can't wait to make more calendars! I also have a Christmas Card class scheduled, so need to finish making class kits. It will probably be my last class for this year since the holidays are coming up.
Just wanted to share yet another non- cutsie calendar with you today. I really liked this DCWV stack I bought earlier called Linen Closet. I love this color combo and the fact that the stack was already trimmed down to about the size I wanted to make. The great thing is that the smaller mat stack size, the smaller the print too. The 12x12 stacks have larger prints that don't work for this type of project.
Decided to go with a floral theme this time. Found all of my old paper flowers in blue and brown and used them a lot in this project. I love the simplicity of this project- not too busy to look at but refreshing colors. Not too busy on the eyes. Again- if you have any feedback, please share it with me. I appreciate sincere honest feedback.. in otherwords, you can tell me it sucks and I won't get hurt or hold it against you. :)
Wednesday, November 17, 2010
Asian Crane Calendar
Decided to take a departure from my cutsie calendars and make something more mature. I get lots of requests for Asian themed calendars, so I decided to try making one using no colors. Stuck to white, gold, silver and black. This was quite a challenge for me since I'm normally drawn to brights or pastels. I had some trouble with my camera today, I think its cause its sooo dark in the mornings nowadays that I'm not able to get enough light. Plus this calendar has a lot of white, so that doesn't help. Hopefully you can see what I created without too much difficulty.
I'd like to get your feedback on this to see if I should bother making more of this type or not. Your feedback means a lot to me, so I hope you take the time to let me know what you are thinking. Thank you!