Friday, September 30, 2011
My Cup of Tea
Yay! Finally made it to Friday! Where have you been all week? It's been very busy here at my house... getting ready for next month's classes and the next release for Sister Stamps. I know, you didn't even get Release #3 yet and I'm working on Release #4? Crazy yah? Oh yah, and I work a full time job that has nothing to do with stamping. Needless to say, one of the "regulars" at Island Scrapbooking told me the other day that I looked tired. I guess my lack of sleep is beginning to show.
So here's one of the projects that kept me up late this week. Isn't she a cutie? It's one of the new fairwees by Sweet November stamps. I can't remember her name, but she makes me happy. The great thing about smaller stamps is that they always fit on your card! Oh yes, I also stumbled onto this cup of tea stamp set by my other favorite company- Lawn Fawn and knew it would be perfect to use on this box.
As you can see I had some issues again with my photo, really need to get my new camera. I know you can't tell, but above the mug I stamped the steam in versamark and coated it with pearl mica powder for a smoky effect. I guess you'll just have to go to the store to see the sample up close. Its so tricky getting mica powder to photo well.
And here's the front view of the tea box. I'm thinking these would make cute gifts for our neighbors in case I don't end up baking this year!
Thanks for stopping by and have a great weekend! (Don't forget to pick up your Sister Stamps tomorrow!)
Thursday, September 29, 2011
Telescoping Snowman
While perusing through the Splitcoast Stampers gallery, I stumbled upon some fun telescoping cards! I knew I had use this technique in one of my upcoming classes, so I searched for good ideas and decided on the telescoping snowman! Awhile back I had bought this snowman face stamp by Dandelion Designs thinking I would need it one day. It came in very handy and was the perfect size for my project! Here he is all bundled up. I like to think of it as looking down at him...
And here's what he looks like when he's open! I know I gotta change those brads to white, but I couldn't wait to show him to you, so I just left it gold. This is such a quick and simple card to make and the perfect size for a Christmas tag!
I'll be back soon to share the rest of my tag projects for this class. Oh, and did you remember to check out the Sister Stamps blog for all of our blog candy and Debi's blog for more candy? If you haven't already done so, start here... and post on all introductory posts... then check out Debi's blog for Release #3 posts for more chances to win. Oh yes, and don't forget to like Sister Stamps on facebook- you just might be surprised with more candy!
Friday, September 23, 2011
Just Relax!
Happy Friday! Hooray! The weekend is finally here! I am still getting used to 5 day weeks- when is our next furlough day again?
Anyway, as I mentioned in yesterday's post, we have two retirements at the same time in our office, so I volunteered to make the cards. I had this one in mind for quite some time- its kinda the reason why I bought one of these stamps. I didn't know if either of the two girls would like this type of card though, so I took a chance and made it anyway.
Started by altering the pleated center pop up card by making it a 6x6 size. Needed to have enough room for everyone to sign it. Once I figured out how to make it bigger, I started decorating it. Although I knew what stamp I wanted to use on the inside of the card, I didn't know what I wanted for the outside. I had bought this stamp at the same time as the one on the inside, and thought they kinda pair up nicely, so I used this one too- both are Penny Black wood stamps.
Since the girls' apendeges (spelling?) are stick like and I didn't feel like cutting them out, I decided to stamp the image directly onto the background and paper piece the other parts. This became especially challenging on the scarf! Even though it was a lot of work, I think it looks better than if I had to cut out those stick figures! Added in some flowers for color on the grass and added another Island Scrapbooking laser cut- this time in pink to match the card.
Here's a close up of the girl...
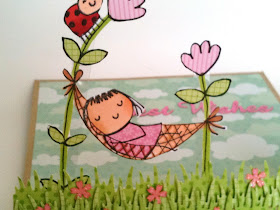
OK- now for the inside... Ta daaaaaaaa! I thought this image would be so cute for a retiree since I would hope they would take time to relax after working all those years. I really wanted to use this image on this pleated center card so I could make the image pop up when laid flat. Here's what the inside looks like with the background...
And here's what it looks like when its open flat.
And I found out the recipient loves cats, so I had to add in a little feline companion! Create in Me makes the cutest animal stamps, so I dug in my stash and added this kitty in the grass.
Oh yah, also used more Island Scrapbooking laser cuts on the inside- the Best Wishes and mini sakuras are by IS.
Hope you have a nice weekend!
Thursday, September 22, 2011
Omedeto Gozaimasu!
We are having a wave of retirements in our department at work and I volunteered to make cards for the two retirees. I really try to match the card to the person, so I asked around to see what they both like, hoping that it would inspire me when making their cards. Here's what I came up with for one of the ladies... She's very sweet and conservative and I just kept envisioning an asian style card for her...
This washi paper is very nice and had so much going on, that I didn't want to take away from it's beauty, so I just added my sentiment and a few flowers, and that's it! I just love these sentiment laser cuts from Island Scrapbooking- they are the perfect size for us cardsmakers!
Here's a shot of what the card looks like inside. To give it some interest, I added those asian looking photo corners by Sizzix. They really added to the plain inside. I also decided to try something different and place the sentiment on the top of the card instead of centered. In the bottom right corner of the middle section, I stamped my favorite kanji poem (Hero Arts) in versamark and then applied the gold mica powder to it for a more subtle effect. Needed enough room for everyone to sign the card, so had to also add paper to the back so everyone could sign.
Hope she likes the card! Be back tomorrow to share the other card I made. Don't forget to check out our new Sister Stamps releases here and here for a chance to win!
Tuesday, September 20, 2011
Release #3 Is On Its Way!
Hi Everyone! Just popping in to let you know that we've started introductions of the new releases over at the Sister Stamps blog. Check it out for a chance to enter our new release blog candy!
Saturday, September 17, 2011
Happy Hallo"wee"n!
Finally got to play with my new fairwee stamps by Sweet November. I just love these little fairwees! So small- so its super fast to color! I also found my old set of hats by Lawn Fawn, which contained a witch hat that was the perfect size for this little fairwee! Paired it up with the heebie jeebie's halloween set by Lawn fawn too. Love how the web has the sentiment right in the middle! I must admit, borrowed the idea about using the hat set from my CBFF Debi. She used the Santa hat on one of the fairwees, which totally inspired me to dig up my old set and dress up my fairwees.
Background was colored using my distress inks- orange, green and purple. Love how you can blend colors you wouldn't normally be able to blend! Have a great weekend!
Wednesday, September 14, 2011
Happy Haunting!
This is probably my all time favorite Lawn Fawn stamp set! I have a soft spot for cute halloween stamps and fell in love with these little ghosts. I was anxious to get my class stuff out of the way so I could play a bit with my new stamps.
I had seen this video on Jennifer McGuire's (my hero!) blog on how to make a floating window card. She has some great tips for hiding your adhesive etc. Go check it out and see what you come up with. I love things that hang and look like they are suspended in mid air, so this card really appealed to me.
I must credit the black background idea to my DH. At first I just stamped Happy Haunting in black on the kraft background. It looked OK, but didn't make the card stand out. He suggested adding the black background and suddenly my card came alive! The ghosts stood out more and so did the moon.
Added the fence punch to give more dimension to the card and left an opening so it wouldn't block the front of the house.
Here's a close up of my favorite ghosts!
Happy Haunting Everyone!
Supplies:
- All stamps- Lawn Fawn
- Fence punch- Martha Stewart Crafts
- Cardstock- Bazzil
Tuesday, September 13, 2011
Happy Winter!
Did I tell you how much I'm loving Lawn Fawn? Their stamps just make me happy... especially the new releases! Couldn't wait to get my hands on those cuties. Making Frosty Friends was one that I knew I had to have. I didn't think that I would use it in a stamp layering class though... But as I sat and stared at my messy desk and stamps, I started to visualize what I wanted to do and here's the end result... I love how this came out! So simple too.
This Lawn Fawn set actually comes with all the accessories for your snowman too! I can't wait to play with them more. Well, that's the last of my class samples. Hope you enjoyed it!
Supplies:
- Snowmen, snowflakes and sentiment stamps- Lawn Fawn
- Snow background stamp- Hero Arts
- pearl mica powder
- cardstock- Bazzil
Monday, September 12, 2011
Season's Greetings
This is actually the first card I came up with for my Christmas stamp layering class. I had seen something similar on the Splitcoast Stampers gallery and put my own spin on it using the layering technique. I think my favorite way to layer is using word background stamps. So simple yah?
For your Hilo bloggers out there, if you would like to sign up for this class, please contact Island Scrapbooking. This class was just added and was not advertised through the newsletter.
Supplies:
- Cardstock- Bazzil
- All stamps-Hero Arts
- gold twine
Saturday, September 10, 2011
Christmas Stamp Layering Class
Gee, its been awhile since i last made a non-Sister Stamps card! Planning my next Christmas Card class and wanted to incorporate the stamp layering technique- its like taking 2 classes in one. I had a few people ask me to offer the stamp layering class again, so I thought why not combine the two?
Here's one of three cards we will make in the class. I decided to try layering on DP instead of just my usual white cardstock. I like to show versatility whenever I teach a technique to show students how to apply what they've learned to make different types of cards. Since the cardstock was already colored, I didn't have to worry about adding in distress ink to the background. Instead I decided to use my favorite music notes background stamp (Hero Arts cling) with versamark and then add my other favorite- gold mica powder to it. Sorry- camera still not working great, but I think this photo kinda captured the gold so you can see how it looks in the light. I know you can't tell, but it also says Merry Christmas above the reindeer's head. If you want a better look, you'll have to stop by Island Scrapbooking. Hopefully I can pick up a new camera soon.
I'll post the other two cards I came up with soon. Thanks for stopping by! Oh yah- for those of you who inquired about where we went to eat dim sum... I wonder if I should tell you? Then it might get too crowded for us to enjoy when we go visit!! Nah- only kidding. We ate at Royal Garden at the Ala Moana Hotel. Super yummy! Where is your favorite dim sum place to eat?
Supplies:
- All stamps- Hero Arts
- Corner punch- Martha Stewart Crafts
- crystals- Kaisercraft
- Mica powder
- versamark
Thursday, September 8, 2011
Yum Yum Dim Sum!
I just love dim sum, don't you? Here in Hilo we are seriously lacking in the dim sum department. If you make dim sum and want to make some money, move to Hilo and sell some to me!
So my blogging GF Linda keeps posting all of her dim sum lunches on FB and makes me drool when I see them! When I finally told her I could meet her in Honolulu, we decided on some yummy dim sum! Now I'm no dim sum expert, in fact, I never really ate dim sum (excluding manapua and pork hash) until I went with my brother and his wife in the mainland. It was a whole new world of food that I had never experienced! I think it's cause my mom can't eat most Chinese food due to her allergies, so we never really went out to dim sum as a family.
So now that you know my dim sum background, you'll understand why I had so much fun... Linda, Kyoko and Cami are dim sum experts! They know the names by the real name, not calling it "the one with shrimp" or "the one with pork and spinach" or whatever it is. So Aunty Jan and I just let them order whatever and we weren't disappointed! Honestly, I don't know what I ate, all I know is that it was ONO!
OK- dim sum was not the only reason I had so much fun.. it really was the company. I brought along Aunty Jan this time because we found out they knew who she was but didn't know she was my Aunty Jan! :) Funny yah? All this time they knew her... probably better than they knew me!
We had a great time - my cheeks are still sore from all that laughing! Can't wait till our next get together- hopefully it will be sooner than later!
Also got the chance to meet up with Eunice! If you have not had a chance to visit her blog yet, you really need to check out her unbelievable creations! We had a nice lunch and got to finally talk story. I felt really bad because the first time I met her I interrupted her Cricut meeting! So rude yah? Wish I remembered to take a picture of us at lunch! Oh well, maybe next time.
Thanks ladies for all the RAKs and more importantly- fun times!
Thursday, September 1, 2011
Season's Greetings
Gearing up for another Christmas card class in August at Island Scrapbooking... I really wanted to make a white on white card this time, but somehow my mirrored silver cardstock snuck in. I decided to make a frame using my reverse wonky rectangle dies by Spellbinder and popped it up a bit on the mirrored cardstock. Before doing so, I embossed the frame using a Sizzix embossing folder. Added the Season's Greetings sentiment by Island Scrapbooking and some snowflakes for fun (Martha Stewart). Very simple and easy to put together. I find my students like simple cards in class, no one seems to like coloring all that much, so I try not to do too many cards that require coloring.
Thanks for stopping by!