Tuesday, May 27, 2014

Forever In My Heart- Part Deux

The last couple trips home, my mom asked me to find the photo that was taken during my wedding of her and my stepdad.  I didn't realize she liked that picture so much!  She told me later it's because he was wearing a tux and never did before.

I was a little worried because when I first started looking for the photo, I looked in my hard drive and didn't find it.  I thought I only had a regular print and was worried I wouldn't find it.  Then I tackled my hallway closet and found it in one of the photo storage containers that had everyone's wedding pictures, including mine.  I was soooo happy to find it for her.

Then I went to make copies of it.  Decided to enlarge one so I could use it on a project for mom.  Then I remembered that Mom's birthday was coming up, so I decided to use it on a canvas.  Here's what I came up with.


The first thing I did was choose the paper.  Because our wedding colors were red, pink, and white, I decided to incorporate red into the project.  Plus mom is renovating her "woman cave" and has opted for a earthy rustic theme. She picked out dark colored wood, rattan type furniture, so I thought the red would match nicely in her new room once its done.

So the paper I chose is from Prima's Stationer's Desk collection.  Lately I've been into the whole shabby chic colors (pastels) but I think it was a good break to go with some bursts of red.  I fell in love with the paper that I chose and love that the opposite side is that dark red.  Its good that the opposite side coordinates well with the side I'm using.... for the reason below... If you curl the paper as I did and the opposite side doesn't match, it will likely ruin your project.


To make this little peek a boo window, you figure out where you want your photo. I then marked it on the paper and then cut an X from corner to corner.  Then curl back each end to reveal the photo.  Oops forgot to add that I sprayed the edges of the canvas with brown before I adhered down the photo and covered it with the DP.  After placing the photo down, I could then start decorating.

Not sure why but I had a hard time with this layout.  It took me several days to figure out how I wanted to do it, but I finally just started gluing and this is what I came up with.

Below is the top left hand corner of the project.  Not sure if you can see, but I layed down a piece of burlap, then a crochet doily, then all the flowers and burlap leaves.  The keyhole was also glued there but the key is at the bottom by the photo.  Oh yes, and peeking out from behind one of the large roses is some bling I got from Downtown LA.  Still having a hard time letting go of my stash, but I think canvases are the perfect project to do so with since it won't be discarded at the end of the day.  The "Love" branch is an embellishment by Prima that I got from one of their warehouse box sales (good find!)


Over the photo, I added some black Prima swirl bling and then glued on another bling from Downtown LA.

Here's the key I told you about.


I think the hardest part was finding the right sentiment for this project.  Not sure if you remember but a few posts back, I shared the mother's day canvas that I made for my mother in law. I used the same sentiment because I felt like this captured my mom's feelings for my stepdad.. he will always be forever in her heart.  Of course I had to add some hearts right?  (Hearts are my favorite!) So I decided to part with one of my heart blings I got at the last Rubber Stamp Expo.  Also shown here is the other part of that black bling and another bling piece from Downtown LA.


Hope my mom likes this present.  I made her a regular copy of the photo anyway because she wanted it for a special frame she bought.  Gonna surprise her with this when I see her.  Happy Birthday Mom!

Saturday, May 24, 2014

Happy Birthday Haley!

One of my niece's is gonna have a birthday soon!  I'm really trying to be good and get my cards out on time.  Hope I'm not too late!  

She loves animals- especially dogs!  Like Daba, my niece has a "Daba" called Woof Woof.  I think her name has changed to Lacey.  My brother (more like my SIL) was smart and got several Woof Woof dolls- just in case.  But believe me they know the difference between the "real" Woof Woof and the fake Woof Woofs.  Akemi could do that too.

So, everytime I see a puppy, I think of my niece. Hope she likes this card.  Oh, and she also likes the color blue, so that's why I tried to incorporate it into my project.


Here's a better look at Kiki...


And it's a pop up card!  Here's what it looks like when you open it up!


Hope Haley has a great birthday!  See you soon!

Wednesday, May 21, 2014

Magic Wands

At work, I joke that I need a magic wand to make all the impossible things happen.  I even bought my (now retired) boss a wand when I went to Disnelyand once I realized all the "magic" she had to do at work.  LOL!  I think I'm gonna start a magic wand collection- what do you think?

So now that you've had a good laugh, I thought you might enjoy this project.  Every year I have to come up with something to hand out at my daughter's annual recital.  This year, I saw some of these wands at the Target dollar bin.  They did NOT come with the embellishments and flowers on it, just the wand with ribbon.  At first I was ready to just hand them out as is, but after I looked at them for awhile, I decided I couldn't let them go without pretty-ing them up a bit.  Here's what I came up with...


I am trying to use up some my stash so I was very free with what I added to each wand.  The must include on each wand was a shabby rosette.  I have an overabundance of these pretties, so I need to find ways to use them up.  Here I added them as a base and then layered other elements over them for different looks.  Here's the five varieties I came up with.  I really should have taken a photo of them without any embellishments so you could see the "before" shot.


Oki doki.  Trying to figure out if I have the strength to make tags for them now.  We'll see- I have another week.

Tuesday, May 20, 2014

Handmade Flowers- Sort Of

Hello There!

I was in the middle of deciding what to make for my upcoming Sister Stamps Release and found a set of large paper flowers that were just taking up room in my container.  I decided to try to use them up by making them into a fuller flower.  I think I would use this type of flower on a project than a flat flower, plus if they are already done, it makes it so much easier when working on a project...

So while I was brainstorming of what to do for my projects, I decided to be useful and work on a project.  All I did was add a large pearl to the center of a flower, and clue the petals around it.  Then kept adding more layers until I had about 4 per flower.  Love how they turned out!  Good, maybe I'll start using them now!


Friday, May 16, 2014

Another Gorjuss Surprise Pop Up Card

Happy Aloha Friday!!!  Did you ever wake up and think it was Saturday... sucks yah?  Well, that's what happened to me this morning, but I'm determined to make it a good day... cause it's the start of the weekend after all!

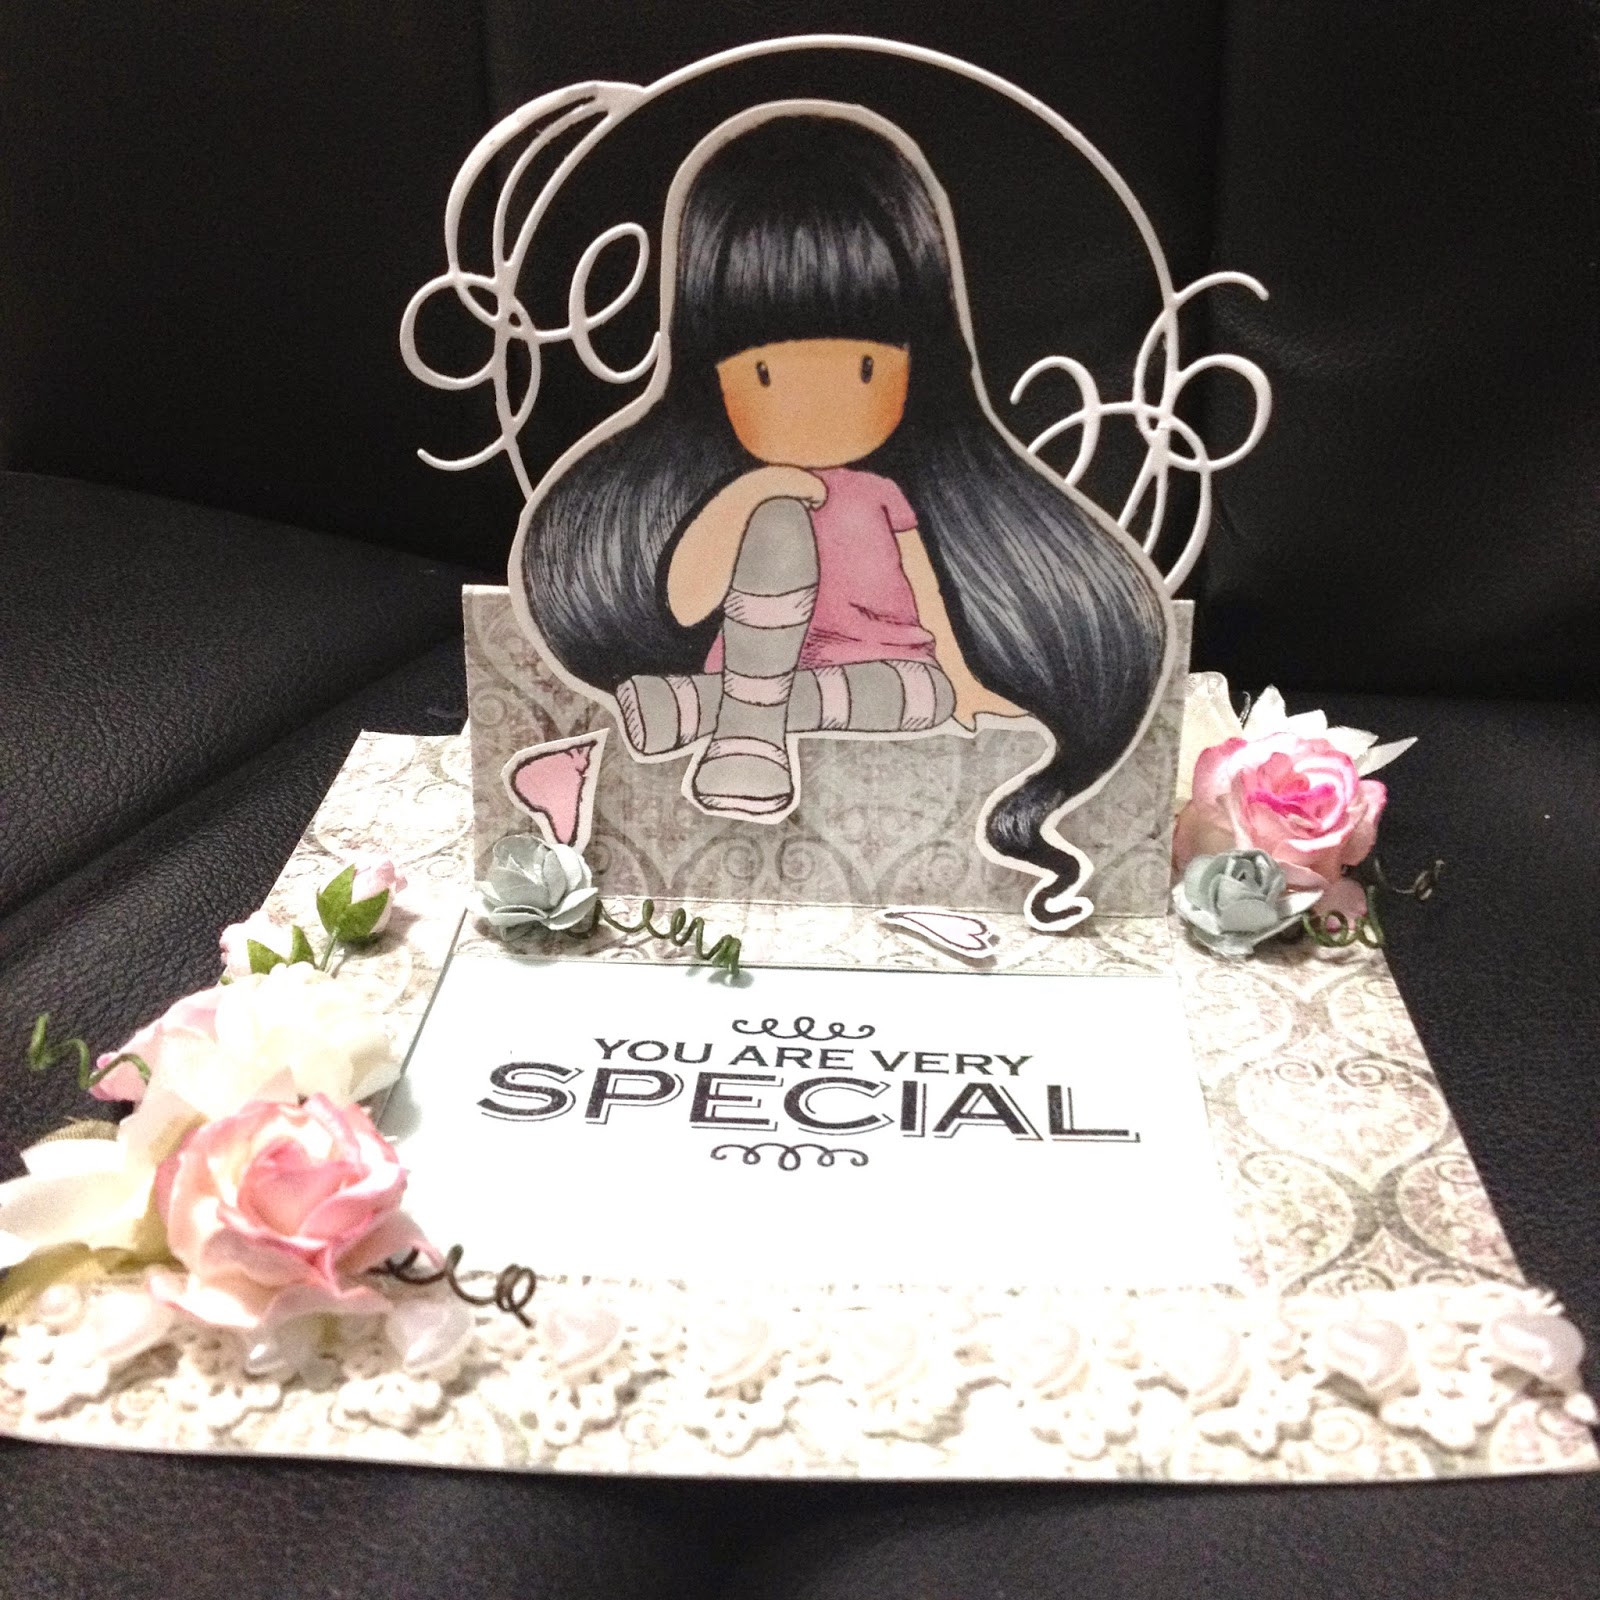
So yesterday I was able to whip up a card using one of my new Gorjuss Girls stamps, Yay!  The new stamps are much larger than the previous releases.  I like the size for canvases and other projects, but its sometimes challenging to put them on my cards.  This card was especially difficult to find an image that would fit, but since this girl is sitting, I thought she might be able to fit on the pop up portion.


So after I figured out how to make the card larger, I made several that are just waiting to be decorated.  This is a great time saving tip because when you mass produce you don't have to keep looking at the dimensions.  I also like this card because it reminds me to use up my 6x6 papers that are just taking up space.

I believe the papers used on this card is by Prima and I want to say its the Nature's Garden stack.  Love this paper!  Since it was predominatly gray, I went with pink accents.  Then I opened it up and realized it had more blue undertones... Oh well.

Here's a closer look at the image.


And some of the flowers I used.. Some are from Downtown LA, Wild Orchid Crafts and I am Roses.


The part I like best about this card is when it's popped up!  I knew I wanted the girl to pop up, but I thought it looked a little empty... so I experimented a bit and ended up attaching a Memory Box die cut behind her so that when you slide the card open, it is still attached behind her and looks like its floating.


Here's a better look at it...


OK gotta go get ready for work!  Have a great day!

Tuesday, May 13, 2014

A Gorjuss Friend

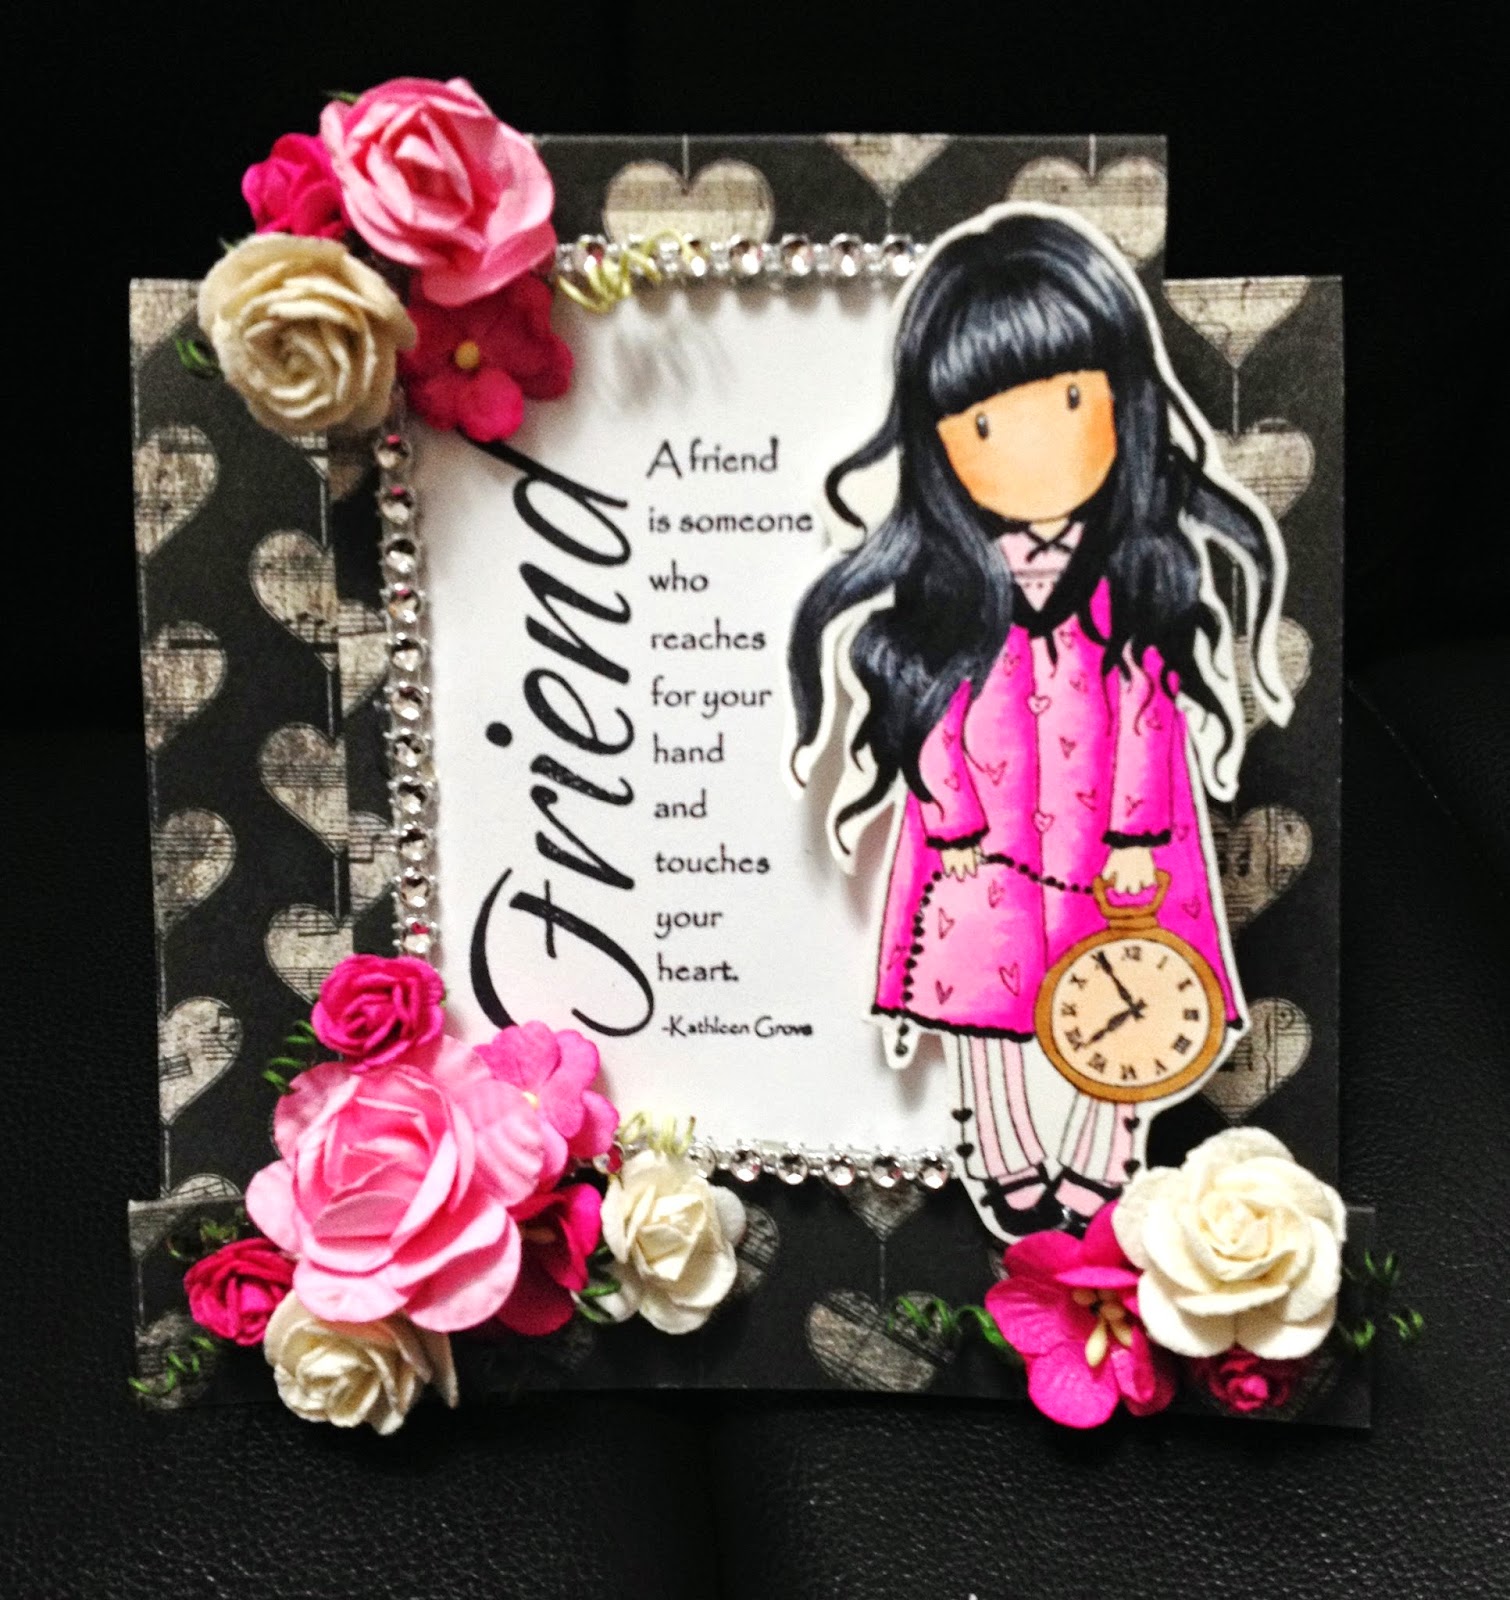
I guess I've become bored again (not of Gorjuss Girls!!)... mainly with regular cards, so I've gone back to my roots and looked up some of the interactive cards that I made when I first started blogging.  What's old is new again right?  While researching...I found the tutorial for this center step card that I don't think I've ever made before!  Believe me, it's super easy to cut!  Before I knew it, I was decorating!


I like the size of the card too cause it can hold my new Gorjuss Girl stamps which are pretty large compared to the older ones.  I also pulled out one of my favorite sentiment stamps by Paper Inspirations.  I don't know if they are still available nowadays, but you might get lucky on ebay or something.

Decided to go with a pink and black theme this time and picked out this pretty paper by Authentique.  This Gorjuss Girl is called The White Rabbit. I thought about putting one of our Sister Stamps bunnies next to her, but I was rushing and forgot about it.  I will have to do that next time.  I think she's supposed to be like Alice in Wonderland?


And of course I had to add some bling and flowers!


Here's that sentiment up close so you can see the words.  Love it!


And here's a better look from the side.  I like how it can stand up on it's own.


OK I'm pretty sure if you don't like Gorjuss Girls, I've lost you on all of these posts! LOL!  I can't help it.  I'm Addicted!

Monday, May 12, 2014

Forever In My Heart

As usual, I've procrastinated to the last minute.  Seriously... I think I do my best work when I procrastinate.  That gets my juices flowing and I get inspired.  Or maybe it just motivates me to get off my butt and actually do it!  

So I've been wanting to do another canvas for awhile now.  I purchased more Lindy's Stamp Gang sprays a few months back and filled them up, but never used them.  I had bought some before, but found them to be too dark, so I bought the lighter shades, which is more my style.  I'm still learning, but I like how the colors ended up blending together.


Made this canvas for my Mother In Law for Mother's Day.  I had made a canvas for my mom earlier but never made one for my MIL. I hope she likes it.  Not sure this is really her style, but oh well.

Before I did anything, I painted a coat of Gesso on the canvas. I don't know if I need to do that, but I did anyway.  After that dried, I used my favorite Prima stencil and modeling paste at the top. It was a bit challenging because I'm not patient and wanted to start the next section, but had to wait till the first section dried.  It's not hard, just took awhile to dry.

After the pasting was done, I started working on the design.  I tried to pick out white or ivory colored flowers as much as possible so I could spray them up with my Lindy's. I saw a few videos where they gesso'd up everything before spraying, so I did that too.

Because Akemi's dress was turquoise, I had to incorporate it somehow into the project.  I have a LOT of turquoise, teal colors, but didn't want to go  too dark, so I opted for the lightest one and sprayed it closest to her so that it would blend well.  Then I worked my way out with green on both sides of the blue, etc.


After spraying up the layout, we went to go eat dinner.  By the time we came back, it was dry, but I didn't think it had enough color, so I did another layer.  This came out much nicer to my taste.

After that layer dried, I filled in the holes with my acrylic flowers.  I only used the clear ones so it woudn't compete with the rest of the layout.

The most challenging part for me was to fill in the "white space" with the sentiment or title.  I had something picked out from another stencil, but the words were too thin, I didn't want to risk it, so instead, I rummaged through my dies and found this PTI set that had dies that coordinated with the stamp set.  I thought "Forever in my heart" was a cute sentiment to add to the layout.

Then I got some floral wire and formed a heart. I was inspired after watching Bona's video when she did something similar using the Prima wire.  I had done something similar before  but didn't add the flowers and stickles this time- just kept it simple.


Hope you had a great Mother's Day!  I think I gotta play with my sprays more often!

Sunday, May 11, 2014

All Occasion Gorjuss

I was playing around with my new stamps and decided to try to mimic a layout I saw earlier while surfing the net.  The layout consisted of rolling back the paper and adding some flowers underneath.  It didn't come out quite like I imagined it would, but I think it looks ok.  Here's what I came up with...


Colored up this  image called the Black Star.  Not sure why she's named that but I thought she had a cute pose. I didn't include a sentiment since I could keep it in my stash and add a sentiment when needed.


I ended up paper piecing her dress this time. I like the paper used by Kaisercraft.  The soft water color looks is so pretty.

Not sure if you can tell, but I painted the corrugated cardboard with some turquoise paint instead of gesso this time for a different look and added all the roses peeking out from under the rolled edge.


And because the corner looked empty, I added a bow using my favorite ribbon- seam binding!!


Thanks again for bearing with my new addiction!  Hope you have a Happy Mother's Day!

Saturday, May 10, 2014

Oh Happy Gorjuss Day!

First of all, I need to wish my dear friend Karen a happy belated birthday! I'm soooooo late in sending her something that I'm a little embarassed!  Karen- don't look at the date I bought your present! 

Because I'm so late, I decided I need to spend some extra time and care in making her card.  Since I'm still on my Gorjuss Girl kick, I decided to incorporate one into the card.  I've been crazy on YouTube checking out old and new Gorjuss Girl videos and found one by Creative Kelly from Cali that showcases an oldie but goodie interactive card.  I think it's called the surprise pop up card by Beate Johns.  Check out her tutorial here.

So I altered the measurements from the original tutorial to mimic Kelly's card to the larger size of 5 1/2" x 5 1/2".  Here's what I came up with...


The papers used are from the Bo Bunny Primrose line.  Again.. trying to use up stuff that I already bought and since I haven't touched this set yet, that was next on my to use list.  The roses are from either Prima, Wild Orchid Crafts, I am Roses or downtown LA.  Also used crochet trim I picked up at my LSS and some prima bling.  This Gorjuss Girl is from the older collection since those stamps are smaller than the new releases.  This stamp actually had a pigeon next to her, but I cut it out since it didn't really match the card.  Here's a closer look at her.


And a closer look at the sentiment and flowers.  The sentiment is from a new Lawn Fawn set called Oh Happy Day.  Forgot to mention that I also added a bunch of flat back pearls.


The fun part about this card is that you can pull the tag in the back and make the card pop up!  It will then reveal the message to the recipient.  I also hid a gift certificate in this compartment.


The sentiment is from a new Paper Smooches set I just got.  Yay!  At least I'm using a lot of my new stuff!


Thanks for stopping by! Hope you are not bored with all the Gorjuss Girls yet!

Friday, May 9, 2014

Thankful Gorjuss

I guess you could say I'm thankful that I found my old Gorjuss Girls!  Talk about hidden treasure!  Again,  I'm late for the party and only bought some of the older sets.  Too bad I didn't just buy all of them then.  Now they are almost impossible to find and I see a lot of people asking how to get the old stamps.  I'm grateful that I did decide to buy this girl as many of others are still looking for her.  You can't even find her on ebay!


Since I guess she is now pretty "vintage" I went with a vintage look to this card.  I used some of that beautiful Maja Designs papers from Sweden that I got from Scrapper's Den.  I need to get more the next time I'm in town.  I also busted out my old spellbinders dies for the frame.  I forgot how much I like that die.

At first I added just the roses around the Gorjuss Girl, but I thought it needed something, so I punched out some leaves with an old Martha Stewart punch and that seemed to add just what I was looking for.  I'm so proud that I'm using my old stuff!  Yay!


Finished the card off with some flatback pearl trim.  Need to find some in different pastel colors.  So I colored up more of the old Gorjuss Girl images, but I'm gonna need to go back to them because the new stamps are calling me!

Thursday, May 8, 2014

Foxy Gorjuss Girl

This Gorjuss Girl is pretty Fox-y!  Not sure why, but there are several Gorjuss Girl stamps with foxes.  I guess they like foxes in the UK?  Just reminds me of that song.. what does the fox say?

In addition to my Gorjuss Girls, I've been stalking Simon Says Stamps for their exclusive dies.  I finally broke down and picked up the dies I've been eyeing.  One of them is this pretty heart die shown here.  Their dies remind me of the Memory Box dies- they cut really well and have delicate images.


I layered some lace and then added some of this old purple floral trim.  Under the trim I used another exclusive SSS thanks die.  I love the font they used!


I decided to paper piece her clothes this time instead of coloring it in.  I only colored her face, hair, socks and fox.  Added a small acrylic flower to her lapel.


Added on another sparkly heart to the center of the SSS die cut.


One more card to go from this set!  Check back soon to see the last card!

Wednesday, May 7, 2014

Pretty Gorjuss

Can you tell I'm running out of titles for my Gorjuss Girl posts?!  LOL!

OK So this image is one of my favorites. Not sure why, but I think it has something to do with the flowers.  I decided to not put a sentiment on this one just yet so I can just have a card ready to go and add the sentiment when I'm ready to use it.  This is from the old collection that I got years ago from Sugar Nellie. I don't think they sell these stamps any more though.  I'm so sad because I never did pick up all of the old images.  At least I didn't sell all of mine.


I started off by using some of the Maja Designs paper I picked up from Scrapper's Den.  I LOVE THIS PAPER!  I think its from Sweden, but not sure. It's so pretty, and hard to find. I used more in another project.  After cutting up that precious paper, I added some dangly lace to the bottom of the card.  Decided to color up the "grass" around the image to make it look more like a scene.  Then added the pennant banner using my mini punch and gluing it to some seam binding.  That mini bow I put in her hair is from the Rubber Stamp Expo.  I liked it cause of the small size.


And I added in some flowers (of course!).  I love the large white one.


Yes, more Gorjuss cards to come!

Tuesday, May 6, 2014

From The Bottom Of My Gorjuss Heart

I think this stamp is actually one of the new Gorjuss Girls.  I got her before the rest of my order came, so I couldn't wait to make a card using it.  The new images are much bigger than the other stamps I got.  The card size is 5 1/2 x 5 1/2 and she fills up a lot of the card.  I like that she's holding a letter with a heart on it.  The sentiment used is from a new Paper Smooches set I recently purchased.  I thought it matched nicely since her letter has a heart.


Because I had made so many birthday cards earlier, I decided I needed some other cards besides birthday, so I thought I could always use thank you cards.  Since the sentiment references hearts, I added a sparkly heart to my bow made of seam binding.  Here's a better look at the Gorjuss Girl.


Oh, forgot to mention that I also used this frame by Memory Box. I  love how it adds just enough of an accent around the sentiment to call attention to it without over powering the rest of the card.


More Gorjuss Girls to come!

Monday, May 5, 2014

Twinkle Twinkle

I've re-discovered Gorjuss Girls now that they have a new release.  While I anxiously waited for my order to arrive, I played around with my older images.  After I made cards with all of the clear stamps I got, I remembered that I had a set of older Gorjuss Girls. I just hoped I didn't sell them!

So one day, I was determined to go through the hallway closet.  My daughter's board games were overflowing into the hallway, so we sat there and organized the closet.  Once we got past all the games, I found my stamps!  Woo Hoo!  I felt like I hit the jackpot.

Here's one of Gorjuss Girls I found.  She was holding a star, so I paired her up with the cute Lawn Fawn paper that had stars and moons.  Decided to keep this one pretty simple and only added the Tiffany frame die by Memory Box behind her.  The Twinkle Twinkle Little Star sentiment was from a PTI set.  Love that set!  More on that on the inside of the card.


Here's a better look at the Gorjuss Girl.  I had a hard time with her dress because I wanted to go with a navy color, but didn't have any colors that were lighter that would blend with is except for one that was really light.  So I improvised and used my colorless blender to pick up the color on the darker pen and blended it out. Then used the lighter color to blend it in. I think it came out ok.


I love the sentiment on the inside of the card.  Its from the same PTI set.  Instead of stamping the star, I just cut out a star from my Lawn Fawn star die set.


I have a lot more Gorjuss Girls to share.. Be back soon with another card.