Showing posts with label 3-D projects. Show all posts

Sunday, October 5, 2014

I Thank My Lucky Stars...

 Well, it's been awhile since I last blogged.  Sorry for the absence, but craft fair season is right around the corner, so I've been crafting, just haven't really had the energy to update my blog.  Although I'm in "mass production mode" (aka I have a lot of unfinished projects in the works), I thought I'd share an older project that I did for my friend Cami.. (Hi Cami!)

Cami's birthday was last month and because I only get to see her when I go visit Oahu, I had to plan ahead and get my project done for her birthday.  We had already agreed on the clipboard swap (see previous post) so I had to get that done too, but I still wanted to make something for my friend.  We decided to deviate from our usual dim sum and go to Tsukiji's for lunch.  It was good!  Now I know why it's Cami's favorite!

On to the project...  I had found this alarm clock from Ross awhile ago and had always meant to alter it.... Then I saw Sabrina's clocks, which inspired me to dig mine out of the closet and make one too!  My biggest challenge was the painting.  It was a really dark color- not sure if it was brown or black, but you get the idea.  It took several coats of gesso and paint to get it the color that I wanted.  I went with white since then I could accent it with any color flowers.  Here's how my clock came out...


I think I shared earlier that Cami loves Magnolia images, so I decided to use some of my new stamps on her clock.  These girls are growing on me! I think its cause they really match the whole shabby chick thing.

I found some of my little birds and added a pink one to the handle.  (oops, you can really see the glue there!)


I added this Tilda stamp on top of the clock.  It was fun to play around and add her to the outside of the project.  I stamped her with a brown ink before coloring and really like the results.   BTW- all flowers are by petaloo, Wild Orchid Crafts, and Prima.. oh and some from Downtown LA.


Here's a better look at the main image.  I think she's one of my favorites.  Do you also see that teapot stickpin?  Love it!


Sorry, this shot is a bit difficult to see.  I used a piece of silver mirrored cardstock and embossed the sentiment in white.  I like this new stamp set I got from Simon Says Stamp called W plus 9.   I thought the sentiments in the set were cute and matched this project.  I was kinda worried about the embossing on mirrored cardstock, but it seemed to come out ok.  Oh yah, that pearl star is from DIY boutique.  Love it!


A better look at that cute teapot stickpin!


Here's the side of the clock that is right behind the Tilda image. I think you can see that I actually ran some lace around the clock before adding all the flowers.


And here's the back of the clock where I wrote a message and added more flowers.


Cami really seemed to like it! I'm so happy!  It was pretty fun to make.  I have a few more frames that I should try out too.  Now I want to get more of those alarm clocks!

Sunday, April 6, 2014

Hoard Vault Swap with Scrapstress

Hello Peeps!  Just wanted to share a swap that I did with my new friend Rina "Scrapstress"!  Let's just say that I was kinda intimidated to swap with this girl since she does awesome work!  Lfundoo doesn't make me feel any better by scaring me with her comments after she saw Rina's project for me.  Yikes!  Hope she likes what I made for her! (Biting my nails).

Well, it's too late now right?  If she really hates it, she can peel off the name and re-gift it to someone. Bwahahahaha!  So speaking of peeling off the name... check it out...


Did you notice?  Well, Lfundoo did when I showed her a sneak peek at my project.  That's what I get for working on it when I'm sleep deprived.  How embarrassing it would be to have given this version to her!

So I fixed it by adding in the missing "s".  Good thing I had Linda proof read it for me.  LOL!


So I started with a suitcase looking box I found at Ross.  You can get some inexpensive boxes there and alter them- cheaper than using real wood boxes and it comes with the hardware!  First thing I did was paint the box. I hate painting... want to just get to the part of decorating it, but Rina told me to relax and enjoy the process.  Is she kidding?  LOL!


After I finished painting it, I had to figure out what I was gonna do.  At first I was going to use my sprays on it, but didn't want to mess it up.  So I opted for covering it with paper instead.  Used some of my shabby fence paper- I think its by Kaisercraft.  Love. this. paper!

After I got the paper on, went through my stash of flowers and picked out a bunch in pink, celery green and white.  We asked each other about preferred color scheme and this is what Rina said she likes.


After putting on the flowers,  I felt like the top left corner was too bare, so I added on a banner using some seam binding.  The banner was punched with my new SU banner punch and Prima Princess papers.  Added one of my rhinestone butterflies from my Downtown LA haul.


Then it was time to decorate the sides.  I was a bit unsure how to proceed because if I used dangling lace, it would interfere with opening and closing of the box.  So I decided it was time to bling the heck out of my project by using this beautiful trim I got from Aarti from One Little Dreamer.  Love it!  Not sure why, but this trim just screams "Rina" to me!


Now the inside doesn't totally match the outside, but I filled the box with some goodies.  We agreed that the only goodies we could buy was non craft related. If we added in crafty stuff, would have to be from our stash.


Oh.. almost forgot to show you the pocket!  This was the first time I made a pocket. Hope it is secured ok.  I used some of the lace on a roll that I have and glued it to the inside cover.  Added some white trim I got in DTLA and then some sweetheart flowers from my stash.


Ok peoples... wish me luck.. hopefully Rina likes what I made!

Thursday, September 12, 2013

Happy Birthday Cami!

Sorry, I've been MIA lately.  Been so busy with Sister Stamps releases that I hardly have time to craft.  But I had to take time out from Sister Stamps to wish my dear friend a Happy Birthday!  I went home for a visit the other weekend and thought it would be a good time to celebrate my friend's birthday.  At first she almost blew the deal, but we ended up spoiling the surprise so that she would show up.  

About a year ago, we had planned to go to A Cup of Tea, which is a Victorian Tea Room in my home town.  My friends don't live in Kailua and don't really have a reason to visit all that often, so it was a nice change for us to meet up there.  

The first order of business was to check the place out!  It was so shabbylicious, I knew they would love it.  After shopping for a bit, we picked our tea and then sat down.  Our server reminded us to try on their hats too, so we went to go check it out.  I don't know if they wanted to, but I forced them to pick out a hat so we could take a picture.  Here's what we ended up choosing...


Don't you just love that flapper hat?  It totally matches her don't ya think?  Next is a shot of my two Besties when we got to our table.


And here's my teapot and cup.  So sweet!


Even the centerpiece was cute!


Here's what I made Cami for her birthday!  I was totally inspired by Vicki's project video here... I really wanted to make something special for her since she is so hard to buy for!  She seems to always find the coolest stuff, so it was a challenge to get her a birthday present.  It's a bit hard to tell from the photo, but I used a round paper mache box, painted it white and covered it with trims and flowers.  Inside I packed it with all kinds of embellishments and supplies.


After decorating the box, I glued it to a glass candlestick so it looked like it was on a cake stand.


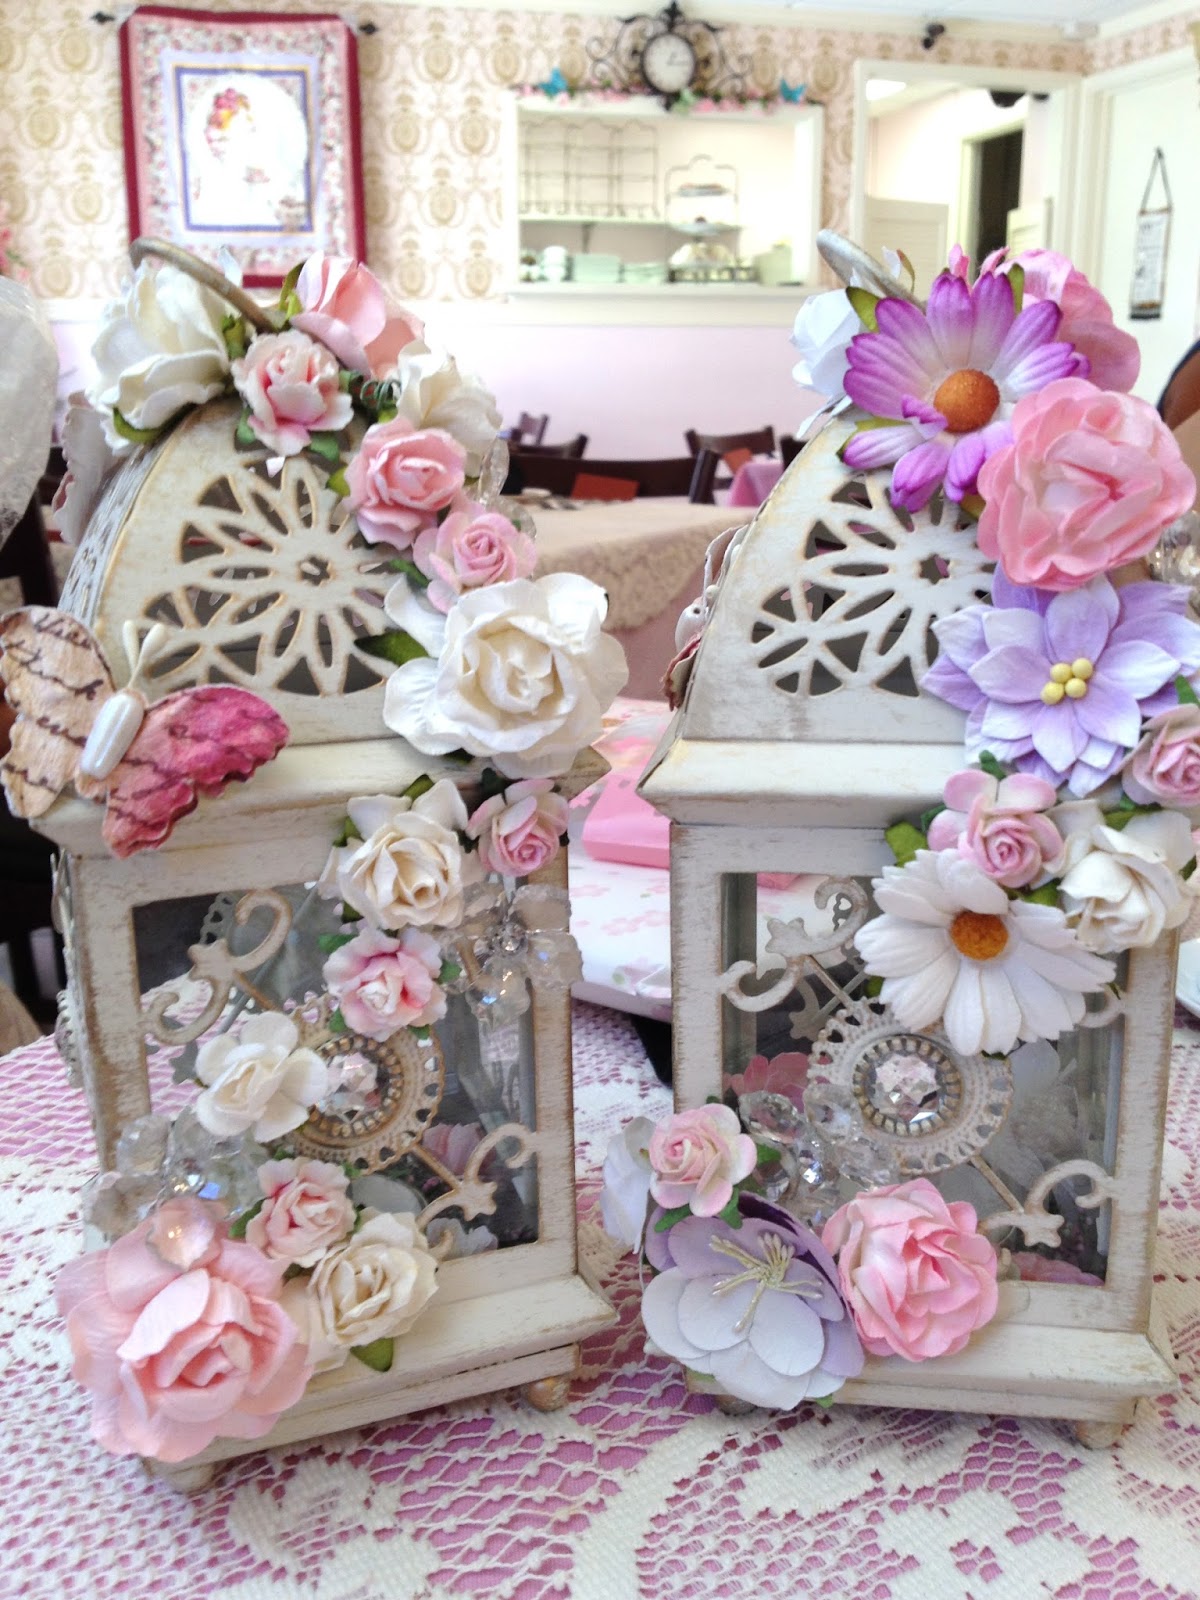
And here's the other project I made for them.  Pink is for Cami, Purple is for Linda...


I had gotten these two lanterns from Pier One over the summer.  I had seen a few altered lantern projects on Pinterest, so when I saw them in the Kona Pier One, I picked them up.  I didn't do mine yet, will post once I actually get to making mine!

I decorated both with flowers from I am Roses, Wild Orchid Crafts, and Prima.  Also included some acrylic flowers and Petaloo butterflies.  Inside there were more flowers and a flameless candle.  Did you know that they now make flameless candles that are remote controlled?  Pretty awesome.

After our tea, we explored Kailua a bit and planned our next trip back to the tea room.  It was such a girly day- so much fun!

The next shot is of Cami's baby Twinkles.  So cute yah?!  She could hardly sit still, but finally layed down long enough for me to take her pix.  Her favorite toy is Elmo.  I think Elmo is as big as she is!


Stay tuned because we are hoping to go back and visit again once the tea room is decorated for Christmas!  Can't wait!

Wednesday, May 1, 2013

Shabby Gumball Machine

It was awhile since I saw my crafty Oahu besties, so I was really really excited for my last trip home.  We had planned to meet up at our usual meeting place- Royal Garden for some yum yum dim sum!  Love it there since the food is ono and they don't kick us out!  Everytime we go, we shut that place down!  Before I share my project, I just have to share this story of a different time we went to RG... 

One of my besties who shall remain nameless, tells us that she made reservations at RG. So when we get there, she goes up to the host and tells them that we have a reservation under "Lum".  I had to pause for a bit before it hit me that her name is not LUM!  What the heck?  So I look at my other friend and ask her... is her last name Lum?  No right?  Then we both start bus' laughing!!!   So after we sat down, I asked her why she gave them her name as "Lum".  She told us that she always gives a fake Chinese name when going to a Chinese restaurant. She said that most of them always get her name wrong, so it's easier if you give them a Chinese name.. So then why "Lum"?  Because Lum doesn't sound like other Chinese names.  Funny yah?  OMG.. I couldn't stop laughing. Hope I didn't share that story before... Oh well if I did, it's worth repeating cause that's damn funny!

Apparently, she is not the only one that gives out fake names.  Found out my SIL also does that. She said at Starbucks, she always gives them fake names because they always get her name wrong. I don't have the nerve to do that.  I think I would forget what name I gave and forget to pick up my order!  This totally reminds me of Friends- do you know who Regina Falangy or Ken Adams is?  If you do, then you are a true Friends fan!

Ok.. so since I was meeting up with my friends, I figured I would bring Linda's birthday present.  Yes, I know I bought her a crap load of Rilakkuma stuff, but I also had to make her something right?   So I know all the rage now is to alter vintage bubble gum machines.  I couldn't find any, so I decided to make my own. I've seen them at Ben Franklin, so I thought I'd give it a shot.  Here's what I came up with...


 It wasn't hard at all, but I couldn't decide if I wanted to glue down the bowl or not.  I asked my friend from work who was headed to Oahu, specifically Flora Dec, if she could bring me back a bag of pearls.  Thanks Marla!!  I really wanted the pearls so that it would look like bubble gum inside the machine.  I decided not to glue down the bowl so that Linda could still use the pearls if she needed them.  This then caused issues with transporting the machine....

So I decided to wrap the machine using tissue paper to hold the bowl on top of the clay pot.  Because it was glass, I didn't want to put it in the suitcase for fear of it cracking, so I hand carried it through security and got stopped by TSA.  The TSA guy asked me if he could look at my bag, which I found weird because I had no liquids, paste or anything in there that I should be stopped for.  So I asked him why he was stopping me and he said its because they couldn't figure out if it was a snow globe or not.  What?  Isn't it an xray machine?

So he then had to unwrap the tissue. I was freaking out because I knew if he unwrapped it the wrong way, pearls would be everywhere!!!  So I was trying to explain to him and to his credit, he did try to be careful.  Then he had to re-run it through the machine again.. not sure why since he now had it unwrapped and could see there was no water in it... by then I was irritated.  He then returns and asks me if I wanted to put it back in the bag. I was so annoyed, that I told him to just put it in.  After I walked away, I thought that I should've taken his offer because he also had a large roll of TSA tape!  OMG that would've been soooooo funny if I gave Linda her bubble gum machine covered in TSA tape!!!!

Anyway, back to the machine... first I painted the clay pots lavender since purple is her favorite color.  Then I added some lace trim to the base and glued on the cover.  To decorate the bowl, I used a Prima pearl butterfly sticker shown here.


I added a large pearl to the lid as the "handle" and then added more flowers by I am roses and Wild Orchid Crafts.


To the base, I added more flowers and prima bling.


On the other side of the lid I added a large Prima butterfly.


Here's another view.

So I guess all that TSA trauma was worth it cause Linda seemed to like it.  Everytime I think about it I crack up!  Of course, if he broke my project I would've had to yell at him.  Don't mess with my craft stuff man!  Happy belated birthday Linda!

Wednesday, April 3, 2013

Another Hot Air Balloon

Hi Everyone!  I'm sooooooooo looking forward to my next and almost last furlough day.  Yes, our furlough days seem to be numbered as we are hearing there will probably be no more furloughs next fiscal (boooo).  I know, I'm crazy, but I guess I got used to furloughs and now I really look forward to the extra day off!

Wanted to share this project that I made awhile ago.  I had asked my husband to take photos and then I guess we forgot about downloading them until now.  Decided to take it outside since it is a good size and needed to be hung.  Try not to look at our dirty garage k?


I believe the paper is by October Afternoon.  Love when I can get my hands on full collections.  Makes creating a project so much easier!

Here's a close up of the little banner flags I cut using my PTI die.  I like the twine too- thanks Debi!


On the top of the balloon, I glued a couple of roses.


Here's a closer look at the basket.  Decided to use some of my Maya Road trim.  Oh- and also added some ivory pearl trim around the edge.  Topped it off with some roses.


 If you want to see this in person, its hanging at our LSS Island Scrapbooking.  When I walked in I must've walked right past it!  Totally didn't look up to see it hanging.  Oh well, if you do go to visit, make sure you look up right when you enter the door.

Time to work on some stuff so I can have a fun fun fun weekend!


Friday, March 29, 2013

Happy Easter!

Happy Easter Everyone!  We actually celebrated Easter last weekend since family was in town.  Also needed to finish up this Easter project early since the recipient was going on a trip and wouldn't be here for Easter.  I knew the only person who would appreciate it here in Hilo is my friend Debi, so I designed it just for her.

While surfing YouTube, I stumbled onto this cool Easter Explosion Box Mini Album by Kathy Orta.  She is a whiz at coming up with cool projects and sells kits/teaches online.  By the time I saw this video, it was over a year after she originally published it.  I bookmarked it for future reference and found it just in time for this Easter.  

I didn't really want to make the box an explosion box, so I decided to just make it a regular box instead but decorate the cover similar to the video- like an Easter Basket... only mine is more Shabby.  Here's what I came up with...


Here's a close up of the box cover.  The box was made using the new Prima Fairy Rhymes paper.  Love love love that paper!  You can't tell cause I covered the cover up, but it has an amazing butterfly pattern on it.  I think you can see it on the box bottom.

After making the box and cover, I attached the handle on with some brads. Kept it simple since I wanted the cover to stand out more.  To decorate the cover, I stared by adding some tulle to the bottom.  Then added some of my home made burlap leaves that I colored using my distress stains.  Then added some I Am Roses roses and some gems/pearls.  Then I used some mini plastic eggs I found at Walgreens (yep, I searched several stores to find the small size and they were the only store in Hilo that carried them).  I decorated them using lace and flowers.  Then I found this chick from my Easter posts last year.  It made a cute addition to the lid.


Around the edge of the lid, I added some ruffled trim and then on top of that added some flower beaded trim.  I wasn't sure I would use this trim I got from Craft Supply, but I'm glad I picked it up.


On the side of the basket, I added some sheer ribbon and made a bow. In the middle, I added a Wild Orchid Crafts rose.


I took a photo from this angle to show you that I had also added one of my home made stick pins to the rose.  You can also see the lace on the eggs too.


And inside the basket, I added in a small notebook I altered.  It was originally a plain kraft recycled notebook I picked up for $1 at Ben Franklin.  With some of the scrap from the box, I was able to cover the notebook.  Then I added some flatback pearl trim along the edge of the book. This was the first time I've ever done that, so I wasn't sure if it would work, but it seemed to work out ok.  Then I decorated the cover using a MS doily (from Debi), handmade flower, and some Petaloo flowers from my stash.  Also added a Pink Paislee buttefly (love!) and Doodlebug heart pearls.  I'm linking these even more than regular pearls!  And finally, I used one of my coveted Melissa Frances lock and key resin pieces.  Love this look!


Here's a better look at those embellies...


 Debi seemed to like these projects a lot!  Glad I decided to give it to her. :)


Wednesday, March 27, 2013

Film Reel Mini

As I've said before, you need to check out Live Love Scrap's YouTube channel.  I saw this project and fell in love... I HAD to try it out.  I already loved the Picture Wheel die by Tim Holtz for my happy memories of my viewmaster, but when I saw her film reel project, I thought it was pure genius!

I used more of the Hello Pastel collection by Prima to cover the picture wheels I cut from chipboard.  Then I cut the toilet paper roll the size of the Tim Holtz filmstrip die and covered it with more paper and glued the two ends to the roll.  Then it was time to decorate!


I had fun using a variety of flowers by Prima, some flower trims by Sa Crafters, Wild Orchid Crafts and Prima butterfly.  I also splurged and used the Scrabble tiles I've been hoarding to spell Amore.

Here's a side view of the film reel.


I cut the filmstrip die out of more Hello Pastel paper and in each frame, spelled out I love you. Then I accented them with All Natural Accents flowers.

You can also fill the frames with small photos to make a mini album.  Love it!

Tuesday, March 26, 2013

Shabby Camera

You may remember the camera box I made for my friend Les' birthday present?  That box idea was awesome, but I knew if I ever wanted to teach a class on it, I would have to make it more classroom-friendly.  Then I thought about how I used the Tim Holtz camera die for the layout that coordinated with the camera box, and thought I could use that for the front of the box instead.  After that, I found this YouTube video that did exactly what I was thinking!  She also made a mini album also using the same die.  I just her channel:  It's LiveLoveScrap in case you want to check it out.

Here's what I came up with using the same technique...  I really wanted to use the new Prima Hello Pastel collection that recently arrived at Island Scrapbooking.  Pastels are definitely my favorite, so I was happy to see these happy colors and thought they'd make a cute camera.  I started off by die cutting the camera, but I think next time I'll also cut one using chipboard so that its more stable.  Then I made the lens and embellished the inside using flowers from Wild Orchid Crafts, pearls and a butterfly using my MS punch.  Also used some pearl and rhinestone bling along with a Recollections gem and Doodlebug heart pearl accent.  On the top of the box, I used a couple of PTI buttons and added a flat pearl for the shutter.


Here's the back of the box.  Used a different paper from the collection since they all work together nicely.

Oh yah, don't forget the fringe from the Tim Holtz trims set.  I had a hard time using it on other projects but it worked nicely on this one.

And here's a shot of the box when it's open.


Here's a close up of the lens and the goodies inside.


I had so much fun making this simpler version of the box.  Less engineering involved but same great results!

Don't forget to check out the Sister Stamps blog for sneak peeks at our upcoming release!

Wednesday, March 20, 2013

Mixed Media Waterfall Album

Hello!  I'm pre-scheduling this post, so I'm thinking this will be mid week by the time you see this.  I told you I've been busy crafting right?  Yup, when the creative juices are flowing, you have to seize the day and make as much as you can.  I stayed up till 2am over the weekend working on lots of projects, so now I have lots of stuff to post!

OK so as I was watching Prima Live with Leeza Gibbons, and Frank's previous Prima Live show featuring Leeza's new waterfall album, I was inspired to make my own version.  Yes, there are no stores here  in Hilo that carry that album, so I thought I'd try to make something similar.  Here's what I came up with.. yes, not nearly as nice as the Prima version, but enough to satisfy me...


I started with some cereal boxes for my covers.  Used my new Sunrise/Sunset papers by Prima.  LOVE THEM!  I chose the lace printed ones for the covers.  After I covered both, I punched the holes using my cinch and attached the binding.

Then I started decorating the cover... started with some chicken wire I bought from our local Ace store and sprayed it with white paint to help rustproof it.  After cutting down the wire to the size I wanted, I adhered it using my hot glue gun.


Then I added some burlap leaves I cut using a Sizzix die and burlap fabric.  The fabric was a light sage color, so I used my distress stains again to make the color how I wanted it to look.  Then I added some gesso to make it look distressed.  After going through my stash, I picked out some flowers by Wild Orchid Crafts, some shabby flower trim, pearls and metal flowers from the sunrise/sunset collection.  I also pulled some wood mushrooms and leaves from Prima.  And do you see the keyhole above the mushrooms?  I cut that from a Tim Holtz die and painted it white.


After I was done with the cover, I got the key that was also cut from the same Tim Holtz die and painted it with gesso and added a white heart pearl by Doodlebug.  Used some twine to attach it to the binding.  On the other end of the twine, I added another metal flower, bauble and pearl


 And now for a look on the inside... I picked out different patterns from the sunrise/sunset line and cut them down to 6" x 9 1/2", and about 1 1/2" shorter for each layering piece.  There are 4 pages on each side, so a total of 8 pages.  I thought I could use the bulkier embellishments like flowers on the part that extends past the page above it.  Before adhering it down to the covers, I punched holes and attached them using seam binding.


Now I wish I had distressed the edges of the pages, but I thought it was just my prototype!  Oh well, maybe next time I'll remember to do so.