Saturday, July 13, 2013

Shabby Twinkles

Here's the other project I worked on for my other friend I was meeting up with on my trip home.  She recently got a new puppy!  I remember how excited I was when I got Kiki, so I thought I'd surprise her by making something she could use as her puppy grows up.

Since her new puppy is white, I immediately thought "SHABBY!"  Whoo hoo! I selected some butterfly paper that I think is by Pink Paislee (don't quote me on that- It may also be Prima) and distressed the edges.  I then did some pasting again using my Dreamweaver paste and Prima stencils.  It's hard to see the pasting that was done, but it's there.  It was meant to be subtle texture in the background so as not to overpower the focal point.  Sorry, not the best pictures, lighting was bad!


The next thing I did was punch some holes and added pearl brads with some twine in between to make a clothesline.  I have been wanting to do this for awhile now.  I thought it would be cool to make a canvas that you could change out the pictures as you want.  You can even print up the pictures smaller and add more photos to the clothesline.

When I asked my friend what she named her dog, she told me "Twinkles".  How cute is that?  Doesn't that just scream glitter?  So I finally took my thickers out of the hoard vault and used them for the title.  These thickers were sticky on both sides, so after adhering them down on the paper, I took off the other side and poured glitter over it to give it that shimmer.


Before putting the brads down, I added a Prima butterfly charm to the line.  I've been hoarding that charm too- was waiting for the right project and finally decided to use it!  My friend LOVES butterflies, so I knew she would love it as much as I do.  You can also see the mini clothespins used to hold up the photo that I covered with some leftover beaded flower trim that was also used on the edges.


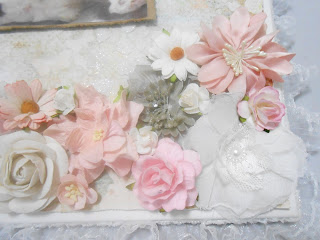
I went through my flower stash and picked out flowers that would match the paper (and the puppy).  See that large pink flower?  I made that using Vicki's (TRYHEART67 on You Tube) puffy flower using rosette trim.  I think it looks better if you use the fluffier flowers from Lavish Laces. I also made that flower center using beaded trim following a tutorial by Muriel (Ms. Cooper's Coop on You Tube).  Love it!  Oh, and also made that gray rose using Simple Stories Vintage Bliss paper (my fave!) and Rosana's (Zoe2000rlh on You Tube) tutorial on how to make that pretty rose!  I used a different SU punch to make mine and almost broke my punch!  It was fun making roses for my friends. I used a lot of Vintage Bliss scraps, so it was a good way to not waste.  This one was an extra that didn't go in their RAK's.  Watching You Tube finally pays off!


Here's the flowers on the other side.  The flowers were from Prima, I am roses, Wild Orchid Crafts, All Natural Accents and Martha Stewart.


 And to top it off, I added one more butterfly I got from Michaels.  Added some pearls to the middle.


Here's a view from the side.  Wanted to show that I added some lace trim around the edge of the canvas and then some beaded pearl flower trim over it.  Love how frilly and girly it turned out!


I was so happy that my friend really liked this gift.  She surprised me by tearing up when I gave it to her.  It made me so happy to make a gift that she really liked.  Hope to meet her puppy in person one day!


Friday, July 12, 2013

Mixed Media Kittys

I missed seeing my friends who live on another island.  Since I had plans to meet up with them, I decided to make them something to show them I was thinking of them.

I've been meaning to do another mixed media canvas project using my sprays, so I thought it might be good to try to make one for my friend.  She has two cats- Girly and Maui.  Since they are both black cats, I decided to go with her favorite color purple and pink.  Didn't know if she liked pink, but I was relieved to find out she did!  Yay!


This project was such a challenge for me! First I painted the canvas with gesso. Then used some of my stencils to add texture using Dreamweaver paste.  I think next time I'll try to use texture paste to see how that works.  After drying both, I started layering chipboard, metal embellishments and flowers.  Once I got the design how I wanted it to look, I started gluing everything down.


After that, I went to work using gesso to completely cover all of the items. I didn't paint the flowers, though maybe I should have.  I decided to add on some clothespins that were glued down, but still functional. Wanted her to be able to change out the pictures if she didn't like the ones I picked.
I'm not used to working with sprays and found myself continuously spraying, drying, blotting, and repeating.  I guess I was too impatient and didn't really let the color dry and set in. After a few hours of spraying, drying, blotting and repeating, I decided to call it a night and go to sleep.  When I woke up, I liked the results much better than the night before.  I guess sometimes you just need to sleep on it!


Here you can see the clothespins I painted and sprayed.  After they were done drying,  I glued on an acrylic flower.


Decided to raid my Scrabble tile stash and use that to caption the project.  Dummy me did not check the spelling of "Girly" and first spelled it "Girlie".  After checking the spelling, I prayed that I could take off the tiles and I guess it worked because they popped right off without ruining the project.  Yay!  You can see Girly sitting on the throne... Yup, the toilet seat!


I gave it to my friend this past weekend and she seemed pretty happy with it.  What a relief!  I was so worried she wouldn't like it.  I think next time I need to take it easy on the spraying and maybe do it on watercolor paper instead like I did on my other projects.

Thursday, July 11, 2013

Thanks Aunty!

Aunty Debi helped us get the facility for Akemi's birthday party this year.  Thanks Debi!  Akemi had so much fun with her friends and we owe it to you and your family!  Here's a card I made to thank her and her husband.  While surfing You Tube, I saw Tamika's CASE it card Tuesday video here... and fell in love! Thanks Tamika!

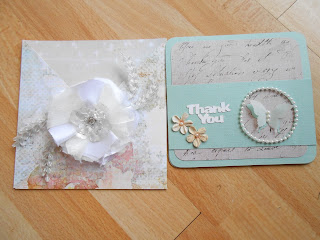
The flower I used was handmade and also inspired by You Tube.  It's made out of satin fabric and the middle is an acrylic flower.  Finally used those beaded wheat leaf thingys that I was struggling with.  Thanks to Cami for showing me how to use them!


Inside the cris cross card, I inserted another card...


Here's a bird's eye view of both...


For the card, I punched out a circle out of a scrap cardstock and punched a SU butterfly out in blue cardstock and vellum to insert in the circle.  Added some pearls to the center of the butterfly.


Added an Island Scrapbooking Thank You sentiment and some Petaloo flowers.  Almost forgot, glued some pearl trim around the edge of the circle.  It's not as easy as it looks!


Inside the card, I added an envelope using the Tim Holtz mini manila envelope die.  It's perfect for holding gift cards or other goodies.  I stuck in a GC to Debi's favorite restaurant.  She's so friendly, the workers all know who she is!


OK Deb- thanks again and don't forget to take your family too!!  Bwahahahahaha!

Monday, July 1, 2013

Happy Birthday Sister Stamps!

I still cannot believe that our little company is turning 2!  Just wanted to thank everyone for all their support over the past two years!  I'm amazed that we are still around as it just started as an idea between two sisters.  Thank you sis for everything!!

I actually made this card for a co-worker's grandaughter's baby luau.  I couldn't make it to the party, but I still wanted to give her a gift.  I had just made a cris cross card for the Sister Stamps blog featuring the new doggie images, and wanted to make another one.  In case you don't follow my Sister Stamps blog... I love this paper line by Simple Stories called Vintage Bliss.  I can't seem to stop using it!  

The paper used is my all time favorite. It looks like a wood fence that has flowers all over it.  LOVE IT!  I added a belly band around it even though it didn't really need it.  Then adhered two large daisies on it.  Stickled the flowers and adhered Mariko to the middle.  


Here's a closer look at Mariko...  She's been my go to stamp for birthdays...


And here's the card that slides out.  Added a tab using my Stampin up tab punch.  Rounded the corners of the card and added the Island Scrapbooking Happy Birthday sentiment.


Thanks again for all your support of Sister Stamps!