Friday, March 29, 2013

Happy Easter!

Happy Easter Everyone!  We actually celebrated Easter last weekend since family was in town.  Also needed to finish up this Easter project early since the recipient was going on a trip and wouldn't be here for Easter.  I knew the only person who would appreciate it here in Hilo is my friend Debi, so I designed it just for her.

While surfing YouTube, I stumbled onto this cool Easter Explosion Box Mini Album by Kathy Orta.  She is a whiz at coming up with cool projects and sells kits/teaches online.  By the time I saw this video, it was over a year after she originally published it.  I bookmarked it for future reference and found it just in time for this Easter.  

I didn't really want to make the box an explosion box, so I decided to just make it a regular box instead but decorate the cover similar to the video- like an Easter Basket... only mine is more Shabby.  Here's what I came up with...


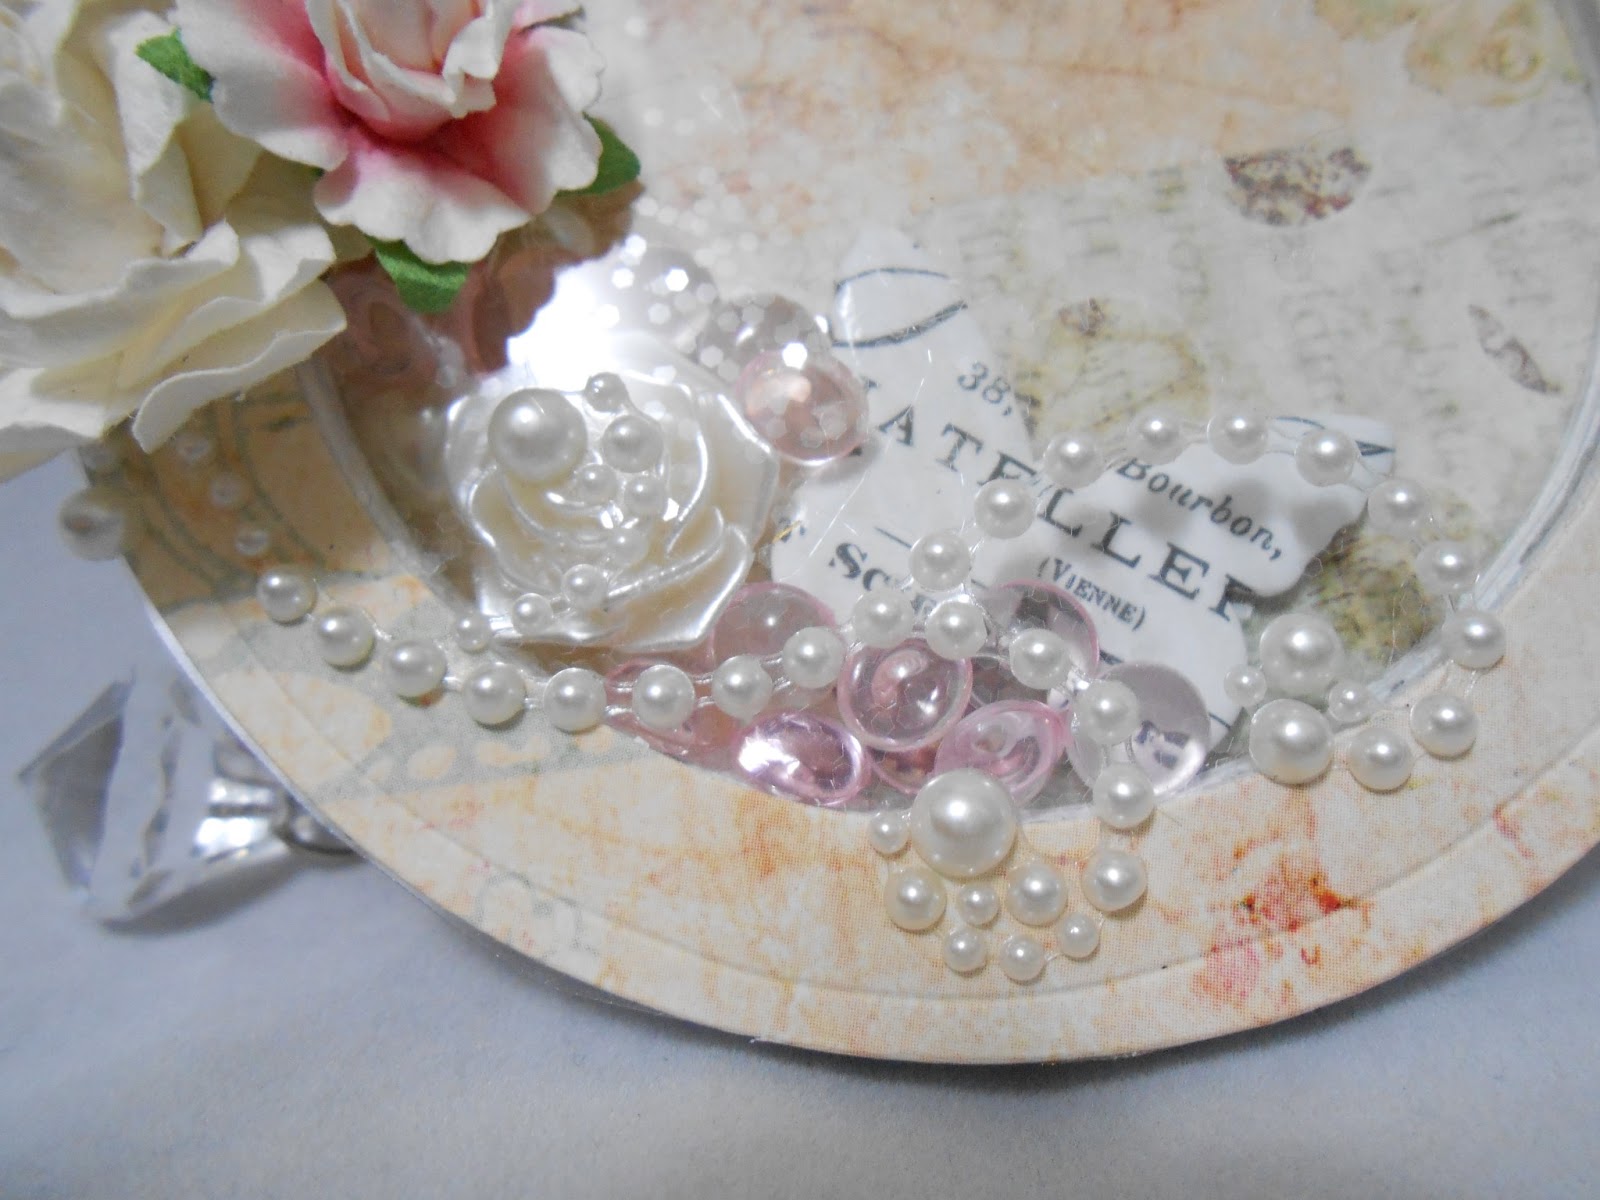
Here's a close up of the box cover.  The box was made using the new Prima Fairy Rhymes paper.  Love love love that paper!  You can't tell cause I covered the cover up, but it has an amazing butterfly pattern on it.  I think you can see it on the box bottom.

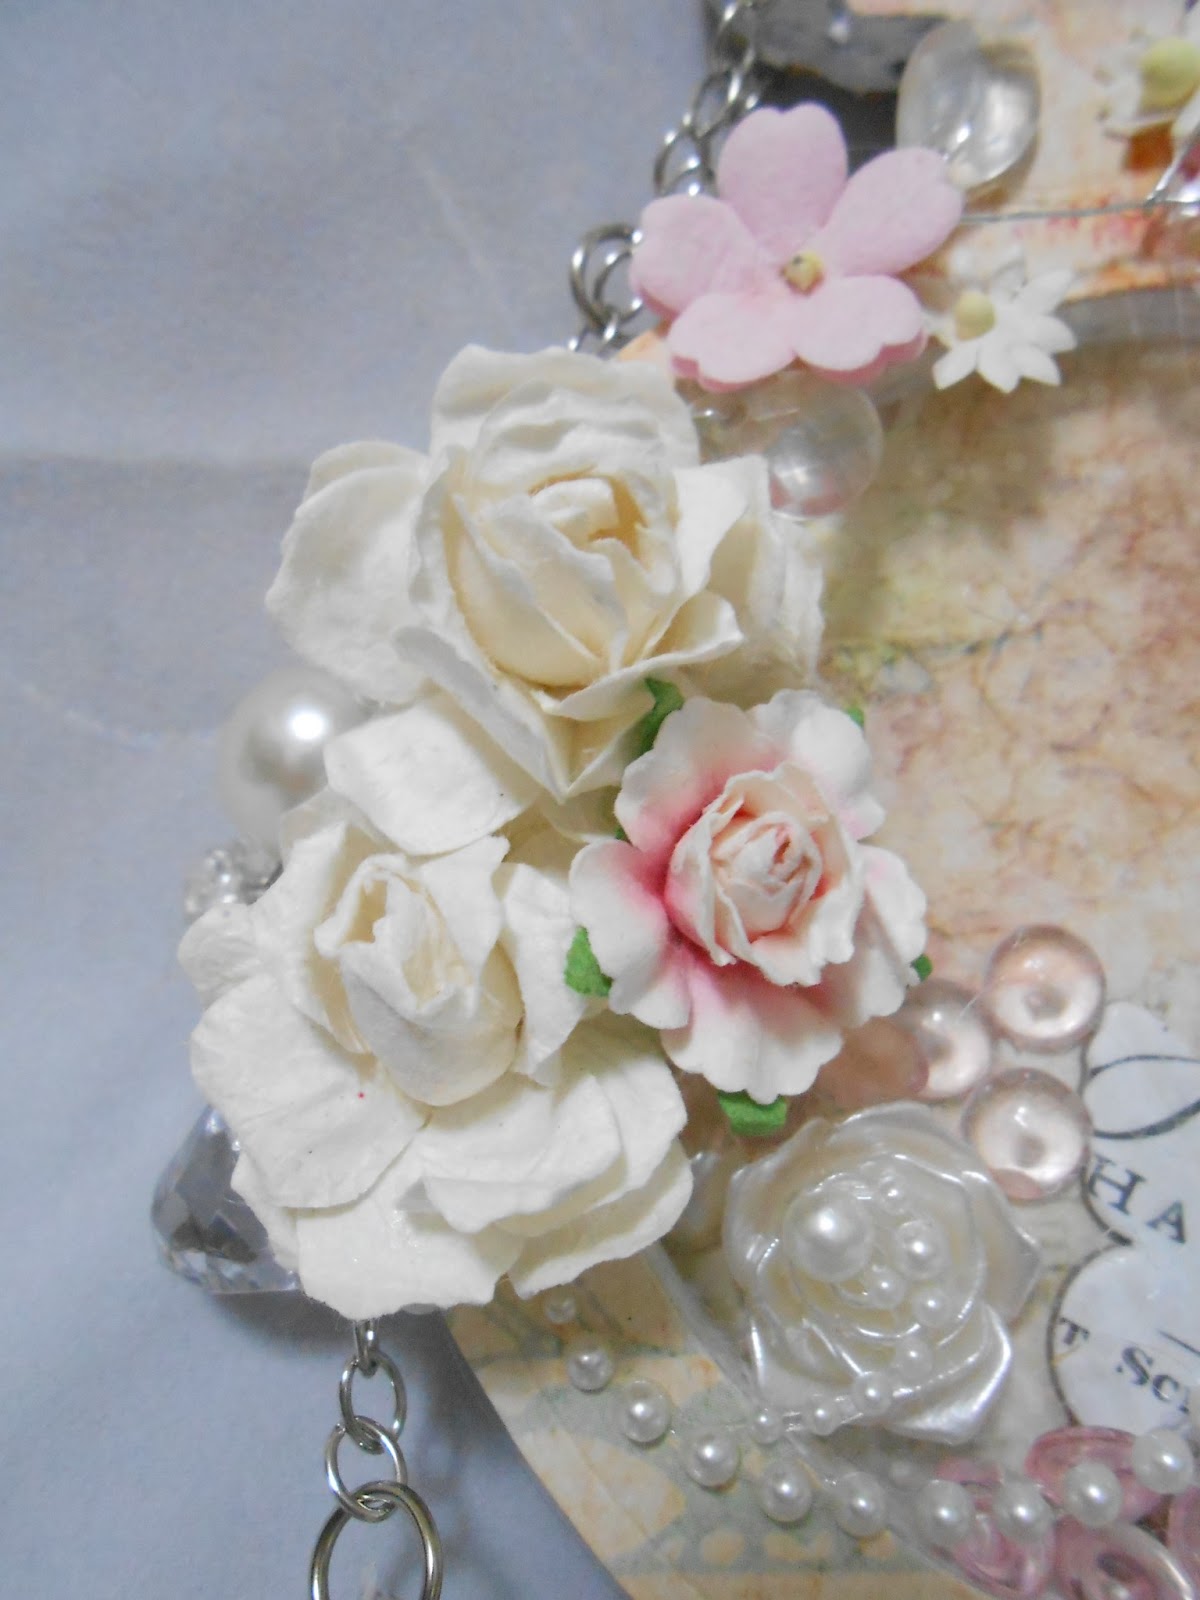
After making the box and cover, I attached the handle on with some brads. Kept it simple since I wanted the cover to stand out more.  To decorate the cover, I stared by adding some tulle to the bottom.  Then added some of my home made burlap leaves that I colored using my distress stains.  Then added some I Am Roses roses and some gems/pearls.  Then I used some mini plastic eggs I found at Walgreens (yep, I searched several stores to find the small size and they were the only store in Hilo that carried them).  I decorated them using lace and flowers.  Then I found this chick from my Easter posts last year.  It made a cute addition to the lid.


Around the edge of the lid, I added some ruffled trim and then on top of that added some flower beaded trim.  I wasn't sure I would use this trim I got from Craft Supply, but I'm glad I picked it up.


On the side of the basket, I added some sheer ribbon and made a bow. In the middle, I added a Wild Orchid Crafts rose.


I took a photo from this angle to show you that I had also added one of my home made stick pins to the rose.  You can also see the lace on the eggs too.


And inside the basket, I added in a small notebook I altered.  It was originally a plain kraft recycled notebook I picked up for $1 at Ben Franklin.  With some of the scrap from the box, I was able to cover the notebook.  Then I added some flatback pearl trim along the edge of the book. This was the first time I've ever done that, so I wasn't sure if it would work, but it seemed to work out ok.  Then I decorated the cover using a MS doily (from Debi), handmade flower, and some Petaloo flowers from my stash.  Also added a Pink Paislee buttefly (love!) and Doodlebug heart pearls.  I'm linking these even more than regular pearls!  And finally, I used one of my coveted Melissa Frances lock and key resin pieces.  Love this look!


Here's a better look at those embellies...


 Debi seemed to like these projects a lot!  Glad I decided to give it to her. :)


Wednesday, March 27, 2013

Film Reel Mini

As I've said before, you need to check out Live Love Scrap's YouTube channel.  I saw this project and fell in love... I HAD to try it out.  I already loved the Picture Wheel die by Tim Holtz for my happy memories of my viewmaster, but when I saw her film reel project, I thought it was pure genius!

I used more of the Hello Pastel collection by Prima to cover the picture wheels I cut from chipboard.  Then I cut the toilet paper roll the size of the Tim Holtz filmstrip die and covered it with more paper and glued the two ends to the roll.  Then it was time to decorate!


I had fun using a variety of flowers by Prima, some flower trims by Sa Crafters, Wild Orchid Crafts and Prima butterfly.  I also splurged and used the Scrabble tiles I've been hoarding to spell Amore.

Here's a side view of the film reel.


I cut the filmstrip die out of more Hello Pastel paper and in each frame, spelled out I love you. Then I accented them with All Natural Accents flowers.

You can also fill the frames with small photos to make a mini album.  Love it!

Tuesday, March 26, 2013

Shabby Camera

You may remember the camera box I made for my friend Les' birthday present?  That box idea was awesome, but I knew if I ever wanted to teach a class on it, I would have to make it more classroom-friendly.  Then I thought about how I used the Tim Holtz camera die for the layout that coordinated with the camera box, and thought I could use that for the front of the box instead.  After that, I found this YouTube video that did exactly what I was thinking!  She also made a mini album also using the same die.  I just her channel:  It's LiveLoveScrap in case you want to check it out.

Here's what I came up with using the same technique...  I really wanted to use the new Prima Hello Pastel collection that recently arrived at Island Scrapbooking.  Pastels are definitely my favorite, so I was happy to see these happy colors and thought they'd make a cute camera.  I started off by die cutting the camera, but I think next time I'll also cut one using chipboard so that its more stable.  Then I made the lens and embellished the inside using flowers from Wild Orchid Crafts, pearls and a butterfly using my MS punch.  Also used some pearl and rhinestone bling along with a Recollections gem and Doodlebug heart pearl accent.  On the top of the box, I used a couple of PTI buttons and added a flat pearl for the shutter.


Here's the back of the box.  Used a different paper from the collection since they all work together nicely.

Oh yah, don't forget the fringe from the Tim Holtz trims set.  I had a hard time using it on other projects but it worked nicely on this one.

And here's a shot of the box when it's open.


Here's a close up of the lens and the goodies inside.


I had so much fun making this simpler version of the box.  Less engineering involved but same great results!

Don't forget to check out the Sister Stamps blog for sneak peeks at our upcoming release!

Friday, March 22, 2013

Shabby Wish

Hi again!  I thought I'd share this card since I shared the other one yesterday... made these two cards in the same night.. was totally on a shabby kick.  

So this time I used some of my favorite Prima paper.. love the butterflies in the background.  Started by distressing the edges of the card base and background paper.  Before adhering it to the card base, I cut a small "x"  using my craft knife and curled up the edges.  I think I distressed them too.  Didn't know quite what I'd be putting inside the hole, but I really wanted to incorporate this technique into a card.


Then I adhered the background piece down and started decorating.  The doily die is also by Hero Arts. Love it!  Cut two, one is the large piece in whole.  I cut the middle out of the 2nd one and mounted that on the larger one. It was a little awkward because there's a hole in the middle of the doily, so I glued the pearl in the rhinestone buckle and then glued it to the doily, then added the pop dot. Seemed to do the trick.

Then I added some roses and finished  it off using some seam binding that I tied into a bow.  I then added my two favorite embellishments... a wish ticket and butterfly chipboard.  The wish ticket is from the Tim Holtz set of tickets and the butterfly is by Pink Paislee.  To simulate the butterfly's flying, I added some crystals.

Then it was time to decide what to put into the hole.  I was thinking of putting in a tiny heart, but then I saw the bag of hearty clay butterflies I made using the Martha Stewart molds.  I never did use them on any projects yet, so I decided that this would be the first time to try.  Just hot glued it down inside the hole and it fit perfectly.. Yay!

Considering making this card in a upcoming class but not sure Hilo is ready for Shabby Chic?

Thursday, March 21, 2013

Shabby Love

When I saw this new Hero Arts heart die I fell in love.  Something about the design was so appealing to me, that I knew I had to have it!  I must say, they cut pretty well, didn't have any problems getting the pieces out.

So I'm still on my shabby kick, and wanted to go with a light blue color this time.  Started with some light blue cardstock and punched one of my Martha Stewart edger punches on one end.  Then mounted it onto a kraft card base.  Then I got some of my lace on a roll and trimmed it down to fit on the card.  I adhered it down and then added some rhinestone trim along the edge where the border punch was used.


Then it was time to decorate!  First I added the Hero Arts heart that I had die cut.  Then I went to my new favorite embellishment.. chipboard hearts by Pink Paislee.  They have a resist on it so if you decide to ink it up, a pattern will show, but I think I like them just plain white better.  Now if they will only make them in kraft...

After that I was stuck a bit... decided to go with the "love" ticket by Tim Holtz, since I was using hearts after all.  Then added some satin roses from a trim that was given to me by a friend.  I cut off the roses so I could use them individually.  And finished off the card using the new white Doodlebug heart pearls.  They come in different colors, but I think the white is my fave.  Here's a better look...


I think it's almost the end of the week right?  Can't wait till the weekend.

Wednesday, March 20, 2013

Mixed Media Waterfall Album

Hello!  I'm pre-scheduling this post, so I'm thinking this will be mid week by the time you see this.  I told you I've been busy crafting right?  Yup, when the creative juices are flowing, you have to seize the day and make as much as you can.  I stayed up till 2am over the weekend working on lots of projects, so now I have lots of stuff to post!

OK so as I was watching Prima Live with Leeza Gibbons, and Frank's previous Prima Live show featuring Leeza's new waterfall album, I was inspired to make my own version.  Yes, there are no stores here  in Hilo that carry that album, so I thought I'd try to make something similar.  Here's what I came up with.. yes, not nearly as nice as the Prima version, but enough to satisfy me...


I started with some cereal boxes for my covers.  Used my new Sunrise/Sunset papers by Prima.  LOVE THEM!  I chose the lace printed ones for the covers.  After I covered both, I punched the holes using my cinch and attached the binding.

Then I started decorating the cover... started with some chicken wire I bought from our local Ace store and sprayed it with white paint to help rustproof it.  After cutting down the wire to the size I wanted, I adhered it using my hot glue gun.


Then I added some burlap leaves I cut using a Sizzix die and burlap fabric.  The fabric was a light sage color, so I used my distress stains again to make the color how I wanted it to look.  Then I added some gesso to make it look distressed.  After going through my stash, I picked out some flowers by Wild Orchid Crafts, some shabby flower trim, pearls and metal flowers from the sunrise/sunset collection.  I also pulled some wood mushrooms and leaves from Prima.  And do you see the keyhole above the mushrooms?  I cut that from a Tim Holtz die and painted it white.


After I was done with the cover, I got the key that was also cut from the same Tim Holtz die and painted it with gesso and added a white heart pearl by Doodlebug.  Used some twine to attach it to the binding.  On the other end of the twine, I added another metal flower, bauble and pearl


 And now for a look on the inside... I picked out different patterns from the sunrise/sunset line and cut them down to 6" x 9 1/2", and about 1 1/2" shorter for each layering piece.  There are 4 pages on each side, so a total of 8 pages.  I thought I could use the bulkier embellishments like flowers on the part that extends past the page above it.  Before adhering it down to the covers, I punched holes and attached them using seam binding.


Now I wish I had distressed the edges of the pages, but I thought it was just my prototype!  Oh well, maybe next time I'll remember to do so.

Tuesday, March 19, 2013

Shabby Pocket Watch

I've been addicted to YouTube recently.  I guess more crafters are embracing YT over blogging nowadays, so I turn to YT more frequently than blogger.  It's especially great for tutorials! Crafters are so cool and share all of their projects which are so inspiring....

All this YT'ing has inspired me to get back in my craft room and start working again.  I'm still on my shabby chic kick... maybe it's not a kick anymore!  Maybe it's here to stay... maybe I'm just getting old!  Paul said that my taste in crafting has grown- not as much cutsie stuff anymore.  Sigh... I guess my age is catching up with me.

So while YT surfing, I stumbled on this video by LiveLoveScrap.  She has some great projects that I couldn't wait to CASE!  I ran to get the new TH pocket watch die and circle inserts.  Now I can't wait till the Tick Tock die comes in so I can make the alarm clock version too!

Here's what I came up with... I ended up cutting a bunch of old cereal boxes instead of regular chipboard.  Its more time consuming, so I think next time I will just use regular cardstock.


I turned the pocket watch into a shaker!  Since it was just a sample, I decided to add in thinks that I didn't care if I wasted, so I started with some old dew drops (remember when they were so popular?), some glitter, and a few pearl hearts.  Then I thought the rose would be small enough to move around but I was wrong.  It kinda stays in the same place and doesn't shake around like the others.  Oh well.  Oh yah, also added in a chipboard butterfly.


I had these white dragonflies, so I glued that to the top of the watch along with a crystal spray and some All Natural Accent flowers.


All pocket watches have chains right?  I decided to put on a real chain and attach some baubles and pearls to it.


I also glued some I am roses and Prima roses to the side of the watch. and finished it off with a Recollections pearl flourish.


Oh yah, the paper used was by Pink Paislee.   I sure had fun making this watch!  I have another idea for two more pocket watches, so hopefully I'll have some time to make those soon.

Monday, March 18, 2013

Tanjobi Omedeto Debi!

Can't believe it's my friend Debi's birthday again!  Decided to actually make her something this time, so I spent some time deciding which project to make for her.  First of all, decided to try out my new Tim Holtz clipboard die that just came out.  I gotta admit, it's pretty cool!  You can actually make the clipboard work and insert a tag or gift card under the flaps.  I bought her a gift certificate online, so I hid it inside the pink card below.


Roses were from Wild Orchid Crafts and wish ticket is by Tim Holtz.  Love those tickets!  


 Added a pearl flourish by Recollections and a button (PTI) with some twine.


Here's the card assembled.


And here's the inside of the card... Don't laugh but I realized after I gave it to her that I forgot to sign it!!


The other part of her present was a shabby chic stacked book drawer!  Here's the front view.  I decided to change it a bit and insert a tin box on the top book. The other two books are drawers.


Here's the view from the top.  I used one of the Tim Holtz book plates and inserted the "dream" ticket.  Added more pearl flourishes and roses and a little acrylic butterfly.  Paper is by Pink Paislee (I think).


Here's a close up of the cover.

Here's the book spines.. Maybe I should've used something other than kraft cardstock.. kinda plain.


Here's the first book opened up.  because I wanted the book to open up, I had to add some seam binding to the inside in order to keep the book cover closed.


Inside the tin I cut some leaves out of burlap and used my distress stains on them.  Also included some Pebbles Inc. clothespins.


And finally- a look at the drawers.  Here's one of them with the goodies I included. One package is pearly roses and the other is white acrylic flowers from Wild Orchid Crafts.

She seemed to really like it.  So glad I made it for her.  Happy Birthday Debi!


Sunday, March 17, 2013

Japan Haul: Gachapon!

I think I mentioned in a previous post that Akemi fell in love with Gachapons!  Gachapons are the capsule toys you can get from Japanese vending machines.  Gachapons ranged between 100 and 300 yen each and were all over Japan.  I think this may have actually cured her of wanting junk American vending machine toys for awhile.

Here's what her stash looked like before we opened them...


And here's all the goodies inside!


Look how happy she is!


And here's close ups of all the goodies...


Cool yah!?