Sunday, June 28, 2009

My First Double Slider!

I know most of you out there in blogland have already seen this type of card before, and are probably thinking... been there, done that. Well, living in Hilo, we don't get as much exposure to the newest card making techniques. While browsing many blogs on paper crafting, I found instructions on how to make this double slider card. I know I've seen this type of card before, but now I found the instructions! Yipee! I must give credit to Dawn of Dawn's Stampin Thoughts, who also puts tutorials on you tube. I also found a set of instructions after I made the sample on Splitcoast Stampers.
Pull the tab and....
Ooooh, Aaaah! (So Smurfy!)
After I figured out how to put the card together, it was a snap! Miss Anya was the natural choice for this color scheme. I just love how I found all these papers that seemed to coordinate well. Since the area that pulls out is rather big, it was a good opportunity to use my large Hero Arts sentiment stamps. They filled up the space well. To add some color, I used some scraps of paper to layer for the background. I just love learning new things!
Supplies used:
Miss Anya stamp- The Greeting Farm
Markers- Copics
Stickles
Cardstock- Bazzil
DP- Die Cuts With A View, Fancy Pants
Plastic grocery bag
Ribbon
circle punch
Dew drops
Have a great week!

Relaxing With Elliot

What a lazy Sunday.... I spent most of today vegging out in front of the TV. I finally got myself off the couch to work on a cool new card, which I'll be posting later. I'm sure its not new for most of you bloggers out there, but its definitely the first time for me.
Anyway, made this card yesterday for one of my friends. She retired recently, so I thought I'd send her a card to congratulate her. Couldn't resist using this new Dandelion stamp... Elliot the elephant is one of my favorites from Jean's collection. See her new stamps here. Now I wish I got the accompanying sentiment... It had something to do with relaxing. Darn!
Supplies used:
Elliot stamp- Dandelion Designs
Markers- Copics
Flower and circle dies- Spellbinders
Ribbon
Relax sentiment- Sizzix Deco Strip die
Stickles
Cardstock- Bazzil
Hope the rest of your weekend is spent relaxing!

Saturday, June 27, 2009

Surprise!! Happy 25th Anniversary!

My mom has been married to my step-dad for 25 years this year. They were planning on renewing their vows in Vegas in front of Elvis (I wish I could've seen that!), but their plans fell through and they ended up not going around the time of their anniversary. Don't get me wrong.. they go to Vegas A LOT! Papa Joe can't seem to get enough of Vegas and begs mom to go as often as they can afford to. So I decided to do something nice for them since they do so much nice things for all of us.... I decided to throw them a surprise anniversary party. It really wasn't that hard since we don't live near each other, so I was able to plan the party without either of them knowing. Naturally, we had to go with the VEGAS theme.. right??
Anyway.. starting from the beginning... Here's the invitation to the party... It was relatively easy to put together. I just used stickers I found at Ben Franklin. Only had to make about 10 invitations, so I could afford to go with the stickers. Decided to use their wedding photo- which was a real challenge because it was stuck to the inside of the frame and apparently it was their only wedding photo- WHAT? I ended up scanning it while still attached to the glass of the frame. Even photoshop couldn't help this photo, so I ended up making it black and white. I guess it worked since we were talking about the past. To give it the Vegas touch, I used gold Stickles to outline the white part. The dies used were Spellbinders Megabilities set.
Here's what it looked like on the inside.
Like all older people... they go to everything EARLY. If you tell them to get there at 12 noon, they'll show up at 11:00am. I knew this was going to be the biggest challenge of the party, so I solicited help from Aunty Arleen. She invited them to lunch for Uncle Larry's Birthday. My only fear was that mom would say "no" which she's been known to do on occasion. We were all relieved when she agreed to go.. Phew! Since Aunty was going to drive them there, we didn't have to worry about them arriving before the rest of us.
We decided to go to the Hawaii Prince Hotel- Prince Court Buffet. Saturdays are the best! Its a Japanese/Hawaiian buffet that includes sushi, tempura, saimin, oxtail soup, shabu shabu and their signature chocolate macadamia nut pie. My DH says its like eating an almond roca pie (except using macadamias instead). Enough about the buffet- just go try it, you won't be disappointed. (Remember to go on Saturdays!)
So Auny Jan helped me with the centerpieces and favors of course. Larry's Bakery (where she works) makes these cool cupcake bouquets! Even the wait staff at the buffet were asking us where we got them since they've never seen it before. Aunty decorated the cupcakes using Vegas themed items. Akemi was in heaven. Aunty also decorated the flower pot and included a die cut frog for good luck.
Not shown here were the cookie favors they made for us using the Las Vegas sign. Sorry- forgot to take photos of the cookies- Hopefully we didn't eat all of them yet so I can get a photo later.
Here's Papa Joe, Grandma Helen and Akemi.
Here's the card we gave to them... I tried to use the same stickers that I used for the invitations.
Inside the card, I used the "slots o fun" sticker and covered the 7 7 7 with hearts.
Here's mom and Joe after the big surprise!
We had a great party. It was so nice to see everyone together to help mom and Joe celebrate their 25th anniversary. It was worth all the work to see the smiles on their faces!

Monday, June 22, 2009

Happy (Belated) Birthday Stef!

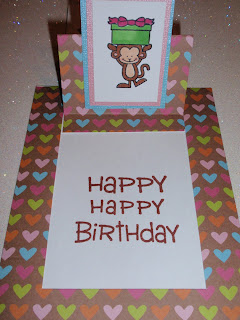
Trying to catch up on all my delinquent b-day cards... My sis-in-law's b-day was a couple weeks ago, but it passed by in a blink, so I'm yet again late... Sorry Stef! Anyway, had to make another pop-up card. You get a lot of bang for your buck since they are relatively easy to make but are very impressive.
I used one of the stamps I was lucky enough to win from Jean at Dandelion Designs! It was the first time I entered to win anything on a blog and I won! I wasn't even really into stamping back then, but her stamps have brought me back to my stamping roots. Thanks again Jean!
This monkey is just too cute. The only reason it reminds me of my sis-in-law is because she calls her son "Monkey". DP is unkown- I got it as a gift and it was part of a set! Sorry! Happy Birthday stamp is by Hero Arts. Thanks for stopping by!

Sunday, June 21, 2009

Happy Fodder's Day!

When it was Mother's Day, Akemi told me "Happy Mudder's Day!" So naturally, she told Daddy, "Happy Fodder's Day!" She cracks me up.
Anyway.. back to the card... Yes, its another magic card. By now, you should be getting bored of them yah? I'll switch to something new soon. Anyway, the story behind this card is that my husband plays Taiko for Puna Taiko. I bought this taiko stamp a long time ago and forgot about it. I found it recently when he asked me to wrap up something for the theater staff to thank them for the last performance. So since i used the stamp for the thank you gift, I decided to use it for his fadder's day card.
This Mari and Me stamp is small compared to The Greeting Farm stamps, so the window was much too big for the size of the stamp. I used the large oval anyway and decided to stamp the sentiment next to the image. Since the white image was so far to the right, I covered the area with a flourish. I wish the image was larger though- would have come out nicer.
Supplies used:
Taiko drummer stamp- Mari and Me
Happy Dad's day- Hero Arts
Markers- copics
Acetate
Ribbon
Washi paper- Hanko designs
Flourish die- Sizzix
cardstock- Bazzil
Wishing all you dad's out there a Happy Fodder's Day!

Thank You Aunty

If you follow my blog, you know that I have an awesome Aunty Jan that is very crafty and comes up with unbelieveable projects. Anyway, this weekend I threw my mom and step dad a surprise 25th anniversary party and Aunty Jan helped me with the favors and centerpieces (all from Larry's Bakery- yum!). I wanted to send her a thank you for all her help, so I decided to try to impress her with the magic card. I've been wanting to test using washi paper as the card cover, and thought the Geisha Anya stamp was a good match.
Here's what it looks like when its open..
Supplies used:
Geisha Anya- The Greeting Farm
Markers- Copics
Acetate
Arigato stamp- Hero Arts
Washi paper- Hanko
Cardstock- Bazzil
Ribbon
Sakura punch
Stickles
Thanks again Aunty for all your help!

Wednesday, June 17, 2009

Father's Day Card

My step-dad is a sports fanatic. He tapes all things sports, watches sports, listens to sports broadcasts on the radio, talks about it and used to play it back in the day.... you get the idea. So when I saw this baseball Ian stamp, I bought it with him in mind... The only thing I couldn't decide on was what color to make his uniform. Let's see, he played for Farrington High School, University of Oregon, Coached for Kamehameha Schools and Castle High, and I'm sure much much more. Anyway, I had to consult mom on this one... she told me to go with Oregon since he has fond memories of when he played for them... Green and Yellow it is!
Since I'm on a magic card kick, naturally I made a magic card for him... Here's what I came up with...
Akemi calls Grandpa "Papa Joe", so I used Papa on the banner.
Supplies used:
Baseball Ian Stamp- The Greetings Farm
Markers- Copics
Cardstock- Bazzil
Acetate
Ribbon
All Star Papa sentiment- printed on computer
happy dad's day- Hero Arts
Happy Wednesday!

Sunday, June 14, 2009

More Magic Cards

While trying to figure out how to adjust the instructions for the Magic Card, I ended up making several samples to check if my instructions were easy to follow. Here's two of the samples I made.
The first one was using Hula Anya...
Supplies used: Hula Anya- The Greeting Farm Hibiscus and Fern die cuts- Island Scrapbooking DP- Reminisce Cardstock- Bazzil Markers- Copics Acetate Raffia My second sample was made using Flutter Anya... This time I tried putting a sentiment on the card so that when you opened it, you would have a secret message. Supplies used: Flutter Anya stamp- The Greeting Farm DP- DCWV Flowers- Prima Flourish die- Sizzix Markers- Copics Acetate Ribbon Have a great week!

Friday, June 12, 2009

Impromptu Magic Card Class

I got fanagled (is that a word?) into teaching the girls at Island Scrapbooking how to make the magic card. After trying to describe how the card worked, I decided to hold an impromptu class for them the next day.
Here's what we came up with...
I told Michele that Kelli and Tracy are not allowed to be in the same classes together, they have waaaay too much fun. Kelli's card is the pink one and Tracy's card is the blue card. Mine is the black and red one. Here's what it looks like up close:
Do you like the hidden scull/crossbones in the flower?
Supplies used (my card only):
All stamps- (Matey collection) The Greeting Farm
DP- Bo Bunny
Cardstock- Bazzil
Flowers, crystals- Hero Arts
Acetate
Markers- Copics
Now that I've got the instructions worked out better, I'm ready to teach a real class. Class schedule will be posted on the Island Scrapbooking blog...
Tracy said her boys were giving her a hard time about taking a "Magic card class" since cardmaking has nothing to do with magic. When she came home, she showed them her card and they couldn't believe it! Maybe now they'll believe we can really teach magic cardmaking... hee hee.

Wednesday, June 10, 2009

Happy Birthday Donna!

I bought the Enchanted Lily stamp set from Cute Stuff in Honolulu about a month ago, but never made anything with it. I just love the Lily line from Pink Cat Studio. I was hoping to get the new Lily at the Beach set but they didn't have it when I went. I'm glad they had this set though since she is so cute as a fairy.
Liann at Cute Stuff showed me a card someone made for her using this set. Lily on the swing actually swung when you moved the card from side to side!!! I was determined to figure out how to do this, so I tried researching it on the blogs but only found one person who posted something similar, with no instructions. I just decided to try it on my own and it worked! See Lily swinging right....
To left.....
Supplies used:
Stamps- Pink Cat Studio
DP- Imaginisce
Carsdstock- Bazzil
Markers- Copics
So you are probably wondering why I wrote Happy Birthday Donna as the title to this post... Donna is a "DT" member for Island Scrapbooking and such a sweet person. Although she had a kinda junkie day today, I hope this card cheered her up a bit. Using the same concept as the card above, I just changed the DP and colors up a little. Donna- hope the rest of your day was better! Happy Birthday!
\
Swinging back and forth... back and forth...
Here's the inside of the card... its hard to see but the sentiment is stamped using two different Brilliance pads (green and blue).
Lily stamps- Pink Cat Studio
Happy Birthday sentiment- Stampendous
Markers- Copics
Flowers- Prima
Crystals- Hero Arts

Tuesday, June 9, 2009

Halau Hula O Anya

Once upon a time, many years ago... believe it or not....I actually danced hula! Yes, my mom did force me to take lessons and eventually gave up making me go. This stamp reminds me of those days after school when I used to go to practice and dance with other girls my age. Naturally, I had to make more than one Hula Anya so she can be part of a halau! They are so perfectly in sync too- much better than my halau ever was!
Supplies used:
Hula Anya stamp- The Greeting Farm
Markers- Copics
DP- Stamping Station, In Glitz
Cardstock- Bazzil
Thanks for stopping by!

Monday, June 8, 2009

Graduate Ian Pop Up Card

My DH asked me to make a graduation card for someone he plays Taiko with. The school colors are blue and gold and it was for a boy, so I automatically thought of Graduate Ian! I had purchased the digital images from The Greetings Farm but didn't really use it yet, so I was excited to have a reason to.
Since the Pop Up Card Class was still fresh in my mind, I decided to make it a pop up card. Once you get the hang of it, you can whip it up pretty quickly. Instead of stamping the cover, I decided to see if embossing the cover would work. So I used my Congratulations Cuttlebug embossing folder on the cover and it seemed to work- it didn't affect the mechanism of opening and closing the card.
Now, you can't see from this angle, but at the top of the slider, I stamped "hooray" 3xs. Sorry, just couldn't get a good angle of it on my messy desk.
Supplies used:
Graduate Ian- The Greetings Farm
Congratulations embossing folder- Cuttlebug
Congratulations Graduate stamp- Hero Arts
Hooray stamp- Dandelion Designs
Cardstock- Bazzil, DCWV and gold Jac paper (Dreamweaver)
Markers- Copics
Have a great week!

Saturday, June 6, 2009

Magic Snuggle Daba Card

Daba is the name of my daughter's pink stuffed bunny. The term has grown to be any kid's special item that they can't be without (in my family anyway). When I saw this new Snuggle stamp from The Greetings Farm, I just had to get it since it reminded me of my daughter.
I really wanted to try making this card after seeing several versions of it on the blogs. Jean from
Dandelion Designs has a smaller version of this that you can download the pattern. Her's is a good size if you are using her stamps since her stamps are on the smaller side. Since I wanted to use the Snuggle stamp, I ended up following the instructions for the Magic Card found on Splitcoast Stampers. I had some problems and still need to figure out somethings but overall it came out pretty cute. Michele from Island Scrapbooking helped me embellish it- she did a good job... much better than what I would've come up with. Here's the card when its closed up. Here's what it looks like when you pull the ribbon... Ta Daaaaa! She's now colored! Here's a close up of Snuggle. I think she's my favorite of the Hope and Grace line of The Greetings Farm! Supplies used: Snuggle stamp- The Greetings Farm DP- Bo Bunny Cardstock- Bazzil Markers- Copics Flowers- Prima and Hero Arts Bling- Hero Arts Flourish Die- Sizzix

Pop-Up Card Class

I took an awesome class today at Island Scrapbooking. The class was actually offered last month, but I was super de-duper busy and couldn't take it. Since I knew Debi (class instructor) everytime I saw her, I would bug her to do another class in June so I could take it. I guess I must've bugged her enough, because she did one more session.. just for me!!!! Thank you Debi! It was soooooo worth it! I can't wait to start working on different variations!
Here's what we made in class.
Here's what it looks like when you pull the ribbon. You can actually stamp a greeting in the white part and the white part that gets pulled out of the card. The possibilites are endless! She also showed us some cool variations using the new Greetings Farm stamps.
Thanks again to Debi for doing one more session for me!
Supplies used:
Cardstock- Bazzil
Stamps- Hero Arts
Markers- Copics

Friday, June 5, 2009

Surf's Up!

Its Aloha Friday... no work till Monday! Yipee! This week went zoom zoom zooming by. I can't believe its Friday already! Yay! Time for me to work on some crafts! Here's my first project for the weekend... I finally opened up my new XL Sizzix Spinning Platform die and decided it was time to use it. Now if you look at the die itself, there is only one piece that will be cut from the die and frankly, you can't tell what the heck the piece is for. After reading the instructions several times, I figured it out- its really not that hard and very quick to make.
The front of my card was actually made after I had planned out what the spinning image would be. Do you like the little crab at the bottom? He's a custom laser design from Island Scrapbooking. I used a red crab and shadowed him with a black crab to give him a little dimension.
Since the image would be "spinning", I tried to find an image that would look cool if it moved... so I chose Surfer Ian from the Greetings Farm. He was perfect!
Voila! Here's what the card looks like when you open it...
Here's a closer image of the Surfer Dude!
In case you were wondering, the "waves" were emobssed with my swirls Cuttlebug Embossing Folder and I hand cut out which waves I wanted to use for the card. I then sanded the raised areas so that the white core would show. The "Aloha" sentiment and small crab are also custom laser cuts from Island Scrapbooking (click here for IS site).
Other supplies used:
Surfboard paper- Bo Bunny
Background paper- The Stamping Station
Surf's Up Dude sentiment- cut from The Blocky Bunch decorative strip by Sizzix
Cardstock- Bazzil
Well, the night is still young and I have a lot of projects brewing in my mind. PLUS I'm taking a cool class tomorrow! It's nice to have a free weekend for once.. hope you have a great one!

Tuesday, June 2, 2009

Heart Flip Album

Happy Wednesday! While browsing the Sizzix website, I found a heart flip album that looked pretty cool. The instructions were lacking, so I had to pretty much figure out how to make this based on the tiny image on their website. Using the XL Heart Pop Up die, I cut about 8 hearts from the die. I guess you could cut more if you wanted more pages, but I wanted to keep it simple. I decided to use the album to document my daughter's big week. Since the album was pretty small, I had to shrink the photos down on my computer so that they'd fit. I also decided to handwrite my titles and journaling instead of printing them on the computer or using stickers/dies... I don't have nice handwriting... so don't laugh!
Here's the front cover of the album. I taped the ribbon in between the cover and the first page and back cover/last page so that you could close up the book by tying a bow. Here's the first 2 pages... Here's pages 4-5. Here's the last 2 pages... I think this would make a cute mother's day or father's day gift. Supplies used: Pop up heart die- Sizzix Cardstock- Bazzil DP- Imaginisce, Doodlebug