Thursday, May 24, 2012

Hemp Daisies

I finally found a great use for my hemp string that has been taking up space in my craft room!  I found this awesome tutorial on how to make these cute daisies, only they used baker's twine.  I like the look of it using the hemp better and decided to incorporate into my next class. 


A couple days ago I also shared the Paper Crafts Library sample using Distress Stains.  I like the colors in this sample much better than the first card I shared, so I thought it would be better to use this one in the class than the blue one.  The red, orange and yellow just brighten up the card and give me warm fuzzies. I guess that's why I gravitated to that Hero Arts sentiment.. perfect right?  Had to glue down the daisies using my glue gun to be sure they would stay.  Hope they don't fall off!

Wednesday, May 23, 2012

Distress Markers Reject?

While coming up with some of my class samples, I played around with using my new Distress pens.    I love the watercolor effect you can get from using them with TH's water brushes.  Yes, I'm not sure yet if this will be the actual card we make in class or if it will be a reject/sample.  I bought a new stamp by Memory Box that I'm interested in featuring, so I might use that one instead of this older Hero Arts stamps.


After coloring in the flowers, I decided to distress around the edges using more spun sugar distress ink.  Playing with my distress markers was a nice alternative to using my Copics!  Guess I should use them more often!

Tuesday, May 22, 2012

Stain Inspiration

Back in April, the Paper Crafter's Library blog featured the new Distress Stains by Ranger.  After just coming off of my Tim Holtz Online Card Class high, I was eager for more Distress info.  One of their cards totally caught my eye... click here for the link and scroll down to the bottom of the post to see my inspiration.

How easy is it to create a nice background using Distress Stains?  I was a bit hesitant about purchasing the stains since I already had most of the ink pads, but this totally convinced me.  I used crushed olive, stormy sky and concord grape to make this card.  You can't tell since I took the photo on my craft sheet, but I mounted it on kraft cardstock.  After I used the stains for the background, I stamped the leaf and sentiment using Archival Ink. Both stamps are by Hero Arts.


I was trying to make some samples for my upcoming class with Debi, and was playing around with my stains.  Totally loving the look and ease of this technique!  If you are in the Hilo area, hope you can join us for our first joint class together!

Monday, May 21, 2012

Harry Potter Birthday

 Yes, its time to start party planning again.  The end of the school year is always hectic in our household.  Not only is there the end of the year stuff, we also have ballet performances and a birthday party all in the same week!  This year Akemi is happy that ballet is not on her birthday as it has been the last few years.  AND a special guest is going to help celebrate this year!  Aunty is visiting just in time to help us with Akemi's Harry Potter themed party.  Now, Aunty is considered to be the Harry Potter expert in our family, so Akemi is sooo excited to have her attend.  Originally it was supposed to just be family, but we allowed her to invite a few friends.

I got the idea the other day to make these Hedwig favors to go with the theme.  At first I wasn't sure how to make an all white owl... so he's not all white as you can see. Oh well, I'm sure the kids won't notice.. that is, except for Akemi.  I'm sure she'll tell me how its wrong, but beggers can't be choosers.


Here's a close up of the owl.


I'm sure I'll be back with more stuff to share from this hectic week...

Monday, May 14, 2012

Paper Bag Mini Challenge

 What a fun weekend!  Just came back from my trip to Honolulu and boy did I pack in a lot of shopping!  I was able to hit the Rubber Stamp Expo and did a lot of damage there. Then went to eat Dim Sum with the Dim Sum Gang.  After lunch, headed to Ala Moana, Step 'n Up, and Ben Franklin for more shopping.  I was pooped by the time I got home, but I felt very accomplished!

One day a few months back, Kimmie, Mrs. Lum, and I were discussing the paper bag mini album.  I asked them if they've ever made one and neither of them did.  So we decided we should all make one as a "challenge" and each person picked two things to include in our mini.  The criteria was to use: lace, any kind of bling, butterflies, punches, tags, and I think flowers.

We were also supposed to use what we had at home, and not buy anything for the project.  Well, that rule went out the door quickly for me as I tried to make the mini using some old lunchbags I had bought earlier.  These were the kind you get from a drug store, not a craft store.  Well, after pulling out my hair in frustration, I caved and bought me some lunch bags from Ben Franklin.  For some reason, these were folded more uniformly, so I didn't have as much "bag" showing.  It was totally worth it.

Since I already broke that rule, I decide to break more and buy this new Prima Songbird paper.  I couldn't resist. It was so pretty and so vintage-y looking, which is just the feel I wanted for my album.  I also found these Tim Holtz corners that I wanted to use now that I've seen others use them on their mini's and loved it. 


Oh yes, wanted to point out the embellishments.  I have always wanted to use these heart stick pins and the colors perfectly matched my project, so I added them behind the Prima flowers.  I also tied this cute lock and key charms to the bow.  I think they are also by Prima.

I don't think you can see from the photos but the flowers were sprayed with my new Perfect Pearls mist.  Love it!

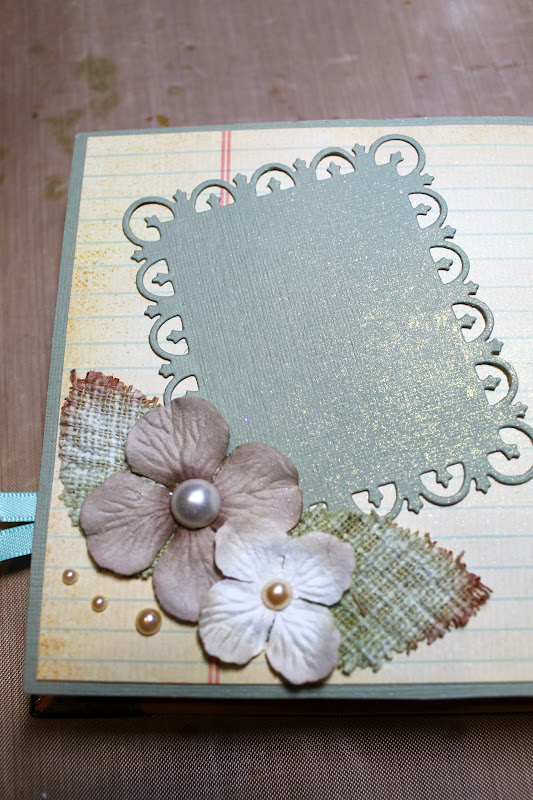
Here's the front inside cover and first page.  I left them blank for now, but will likely add a label or something to the first page.  The ribbon was added to cover the paper bag that was showing in the crack.  Yes, I guess my papers didn't line up well enough.  sigh.  Thank goodness for the Ace of Cakes technique where you add things over your mistakes.


Here's my 2nd page.  Now that I look at it, I realized I took this photo before I finished my album!  What's missing is two butterflies I cut from my CC's designs butterfly dies.  I formed the heart made of all natural accent flowers and pearls.  The pockets were trimmed with some lace and over the lace I added some Recollections double pearl strand that I got from Michaels. Now I wish I bought more!  Added in two small tags by PTI- I like that you can still see the birds on each side.


 Here's the third page.  I accented the pages with prima flowers and pearls.  The die used on the 2nd page is by PTI- love that it comes in 2 sizes for layering.  The bird and branch punch is by SU and the stamp is by PTI.


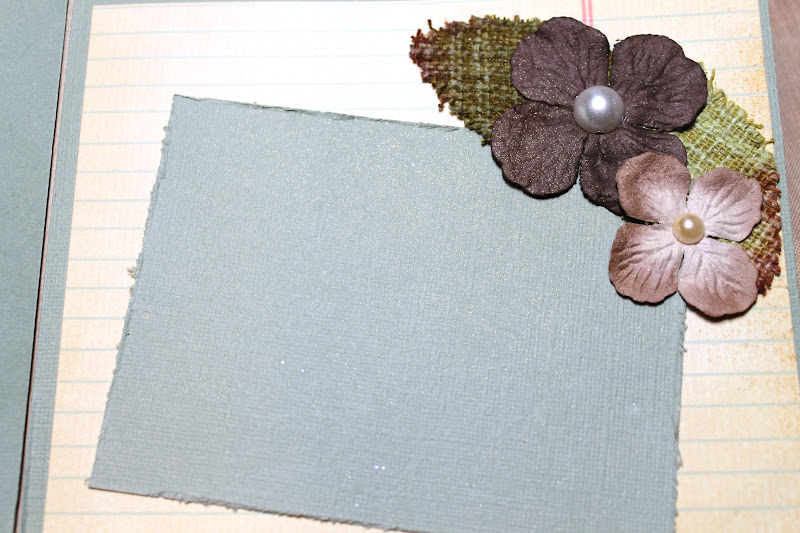
Here's a close up of the flowers.


 If you pull open the page (downward), it opens up and you can add in a photo on the bottom half.  Added some PTI buttons for accent.


Here's a close up of the bird.
And here's what it looks like when you flip the page upwards.  I used a Spellbinder die to cut the label mat and again used the PTI buttons as accents.  Do you see my branch punch by MS Crafts?  That's to cover up the paper bag that was showing through again.


For the next pages I used another Spellbinder die for the mat.  I love that die- it makes such a nice frame.  Then added more flowers and pearl accents.  The middle pocket was trimmed with butterfly lace I got from Walmart of all places.  I added stickles on it for some bling and pearl accents.  The two tags inside are cut using another PTI tag die.


Can you tell I sprayed my Perfect Pearls mist again?  Had fun playing with it.. can you tell?


Here's the other side of the page.


Added more flowers and pearls and another photo mat.


Here's another fun layout.  I decided to use the full page size for larger photos. Used some scraps to make photo corners and accented them with those flowers again.  But wait....


You can flip open the left side to reveal more space to add photos and/or journaling...


 And the same goes for the right side..  Isn't that fun?


And here's the last page... I really wanted to use the birds again at the end.  Since this was a pretty large picture so no photo could be added, I decided to just put the photo mat on the back cover instead.  I then added the Lawn Fawn banner and added in the word "Friends" inside.  The string for the banner was actually from a PTI set.


Here's a close up of the banner and the birds.


 So during lunch I shared this mini with the girls and found out I was the only one who brought mine!  So I have yet to see what they've created thus far on their minis.  I can't wait to see. 

So if you go on you tube and watch all the tutorials, they will all tell  you how easy it is to put together a paper bag mini... well don't believe them!!! hahahahahaha!  Right Kimmie and Mrs. Lum?  Seriously... I don't know if I'll ever do one again.  I guess I'd better cherish this one!

Thursday, May 10, 2012

Show Some Appreciation


My daughter asked me the other day where her origami dog was. She likes to makes dogs out of origami and even figured out to make the body all by herself.  When I asked her what it was for, she said, "oh, today is Teacher Appreciation Day" so I wanted to give it to my teacher. 

Now, normally I'm on top of all the holidays, occasions, etc... I guess this one slipped by me, so after school, we headed to the Starbucks Happy Hour (1/2 off fraps this week from 3-5pm!) for a treat, so I decided to get Mrs. Y a gift card since I recall her saying she loves coffee.  Besides, this gave me the perfect opportunity to use my new PTI set!  I bought this set specifically for when I want to give Starbucks gift cards.  Decided to go very simple this time and just let the colors do their magic and bring the card to life on the kraft background.  Kraft is my go to background now instead of white or cream.

Anyway, if you haven't already thanked your teacher, don't forget!  It's always nice to be appreciated!


Tuesday, May 8, 2012

Happy Birthday Karen!

 My friend Karen (or KI as I call her), go back about 14 years now... Wow!  Has it been that long since I moved to Hilo???  Anyway, we met at work and developed a friendship centered around our love of crafting.  I got her hooked on stamping and now she has her own blog... Check it out here...

Yes, as usual, I'm very late in getting my b-day gifts out. I think its partially because I want to get a gift they'll like or take so much time making their present, that I end up missing their actual b-day. 

Since I got my hands on those new Sizzix flip it dies, I thought it would be a fun and easy card to make.


Love these Doodlebug papers!  Added in another image from Sister Stamps that will be making her debut in July.... She keeps popping up on my blog!  I can't help using her!


And I made this waterfall mini album while hanging out with some friends in Honolulu.  Finished it up by adding the butterfly by Memory Box dies (my new fave) and flowers by Wild Orchid Crafts and All Natural Accents.  This paper line is one of my new favorites by Bo Bunny!


Here's the inside.  Left everything blank so Karen could fill the pages with whatever she wanted to.

This shot shows how the waterfall mechanism works.


Happy Belated Birthday Karen... Hope you like the gift and find it useful!  That's it for now!  So totally busy right now its not even funny! Hope to work on more craft projects soon that I can share-  its hard since sometimes the things I'm working on is for upcoming releases and I can't necessairly share them with you now.. But all I can say is that we have some fun things planned for our next release, which is scheduled for July 1st.  Stay tuned for more info!

Saturday, May 5, 2012

Happy National Scrapbooking Day!

 Good Morning!  Before I rush out of the house for a busy Saturday, I thought I'd share a mini scrapbook with you.. after all, it is National Scrapbooking Day right?

So while prepping my Waterfall Scrapbook class, I decided to use my new Doodlebug baby boy papers to make the instructions for the class.  Yes, I get bored easily and like to work with different papers.  Here's the cover... I finally used that Lawn Fawn polaroid stamp to make the photo of the monkey.  Since I was lazy, I just stamped it again on patterned paper, cut out the inner square, and adhered it to inner square of the polaroid.  Then I placed the monkey sticker onto the patterned background.  Since he looked a little plain, I ended up using one of the pinwheels I bought (yes I didn't make it) from American Crafts- or was it Pebbles Inc.?  Sorry, I can't remember, one of those two. For the banners peeping out, I just hand cut those strips to form the banner point and added buttons by SU for accents.  The picture perfect sentiment came with the polaroid set, so it fit perfectly.


Here's a peek at the inside. I actually used the cardstock stickers to decorate the pages, but I guess I didn't take photos of it!  Sorry!


OK gotta go wake up Akemi... we have a busy busy day today.  Oh... and Happy Boy's Day too!

Friday, May 4, 2012

Baby Girl Mini

 Happy Aloha Friday!  I'm tired but wanted to get this post out as these photos have been sitting in my camera for awhile now.  Made this mini while putting together a sample for one of my classes, so I thought I'd share it with you.  All DP is by Doodlebug Designs, along with the coordinating stickers.  Love how their collections work well together and make scrapbooking so darn easy!

The space next to the Kitty was left blank so that I (or whomever receives this mini) can personalize it for their baby girl.


Found the cardstock sticker sheet that features the same characters from the paper.  Love it!  Here's the baby elephant.


Decided to add some photo mats.  Do you like the little froggy?

My favorite guy is featured on this page.. Isn't the monkey so cute?  Akemi is born Year of the Monkey, so I always think of her when I see monkeys.

And of course- there's a Daba!...


I thought the little girl and bear were cute too. 


Oops!  Forgot to add something under the giraffe!  You caught me!  Guess I wasn't finished after all!


Ok folks- gotta go nighty night.