Friday, October 30, 2009

Christmas Gatefold Scrapbook

OK- I went a little overboard on this one... I admit I got carried away and created a lot more work for myself than I needed to, but I think it was worth it and I think the students in my class liked the end result. The only junk thing is we ran out of time! I guess I need to budget more time next time (if there is a next time that is). I learned how to make this cool scrapbook from Brian at Photocraft, who learned it from a customer in that visited them from Oregon. Sorry, I really don't know who that person is, but she deserves full credit for this technique.
Since the last scrapbook class I taught I received feedback that the students wanted to have the papers selected for them, I decided to make kits (last time everyone cut their own). Since I needed to find non-gender specific theme, I thought Christmas would be a good theme since most people observe Christmas in one way or another.
So after you open up the ribbon and front cover, this is the first "page". The Christmas tree is covering the gatefold.
When you open it up... Ta Daaaaa! I love the pop up effect I was able to get from these Christmas Tree Spellbinders. I told my students that they could also use this technique for cards as well. I decorated the tree using the red Smooch. This metallic paint is great if you can't wait for it to dry. Normally I would have used stickles, but we just didn't have enough time.
This next page is actually behind the Christmas Tree page. I love the background DP used on this page. Too bad you can't see the detail on it. It actually has glittered flourishes all over the page. I used my new Spellbinders Pointsetta die and layered the pieces, then used gold smooch to make the middle of the flower.
Here's another favorite of mine. I used the Fleur de lis pendant by Spellbinders, cut two and made a snowflake using white glitter paper. Then I cut two hearts from my spellbinders and made an ornament. I thought the students could write on the hearts to document the date, place, etc (something small that would fit on the hearts).
The next gatefold I covered using a large Sizzix snowflake die cut from white glitter cardstock.
When you open it up, it looks like this... At first I just cut the snowflakes (sizzix), but decided at the last minute to add in the three snowmen (The Greeting Farm). I think they added something to the page.
This is the middle section of the scrapbook after you open it up on both sides. I kept it simple since there's a lot going on in this section. I didn't want it too distracting since it was like 3 pages in one.
This first page is very simple. Just a large circle and scallop circle cut from spellbinders over two strips of candy cane striped paper.
Everyone got a kick out of this page. I found some cool paper at Island Scrapbooking that had a whole page full of these swirl peppermint candies, so I punched them out and wrapped them in cellophane. This reminds me of the Night Before Christmas story where "visions of sugarplums danced in their heads..."
Here's the last gatefold. I decided to go with a simple star. Reminds me of Macy's.
The inside was decorated with more stars.
Finally, this is the last two pages behind the snoflake gatefold. The letters on this next page were custom alphabets by Island Scrapbooking. Thank you Michele!
I told the students that if they didn't want such a cutsie looking scrapbook to scrap the gingerbread men. I added them in in case they wanted to do a holiday goodies page. In their kits, I decided to stamp the gingerbread men on brown paper instead since I had trouble with the coloring. These cute stamps are by Two Scoops Rice.
I love how this scrapbook turned out. Maybe I'll use this idea to make Christmas gifts this year!
Supplies:
DP: Doodlebug, Reminisce, Best Creation, Imaginisce, DCWV
Cardstock- Bazzil
Gingerbread men- Two Scoops Rice
Snowmen- The Greeting Farm
Snowflake dies, flourish die- Sizzix
Circles, scallop circles, labels #9, pointsetta, xmas tree, Labels #1, stars, scallop square, hearts and Fleur de lis dies- Spellbinders
Ribbon
Stickles
Dew Drops
Smooch
J,O,Y- Island Scrapbooking Laser Cuts
Cellophane
Lace border punch- Martha Stewart

Thursday, October 29, 2009

October OCS

Are you ready for Halloween yet? I have Halloween coming out of my ears! So of course my OCS had to have a hint of Halloween in it right? This month, I was partnered up with Michelle from Mushi's Creative Inspirations. Her stuff is really cute, so you need to check out her blog if you haven't already. She's also been featured on Ben Franklin's The Joy of Crafting Show! How intimidating for me to be paired up with a celebrity!
Since she seems to like Hello Kitty (like me), I went with this cute Hello Kitty dressed as a black cat. This was cut from my HK Cricut cartridge. I don't use my cricut much since the piecing kills me, but this project wasn't too bad... I guess there weren't a lot of tiny pieces. Here's a close up of Kitty.
I actually took the time to decorate the inside for once. Here's what it looked like when you open the card. Supplies:
Hello Kitty- HK Cricut Cartridge
Trick or Treat and Happy Halloween Sentiments- Hero Arts
Ghost digi- Designer Digitals- Mindy Terasawa (Boo to you)
DP- My Mind's Eye (Boo to you)
Drippy goo punch- Martha Stewart
Cardstock- Bazzil
Stickles
And here's my card from Michelle! Michelle was so fast in getting her card to me. Thank goodness Teri gave us an extension this month.. otherwise I'd be really late! I only mailed out her card on Monday! Thanks to Michelle for being patient. Isn't this Halloween image so cute? No wonder she was featured on The Joy of Crafting!
Thanks to Teri, who coordinates the OCS every month. You should sign up for her next swap in November. Its fun to meet other crafters and exchange cards. No pressure of making 100 cards (ok I'm exaggerating, but you get the picture) in a short period of time.

Wednesday, October 28, 2009

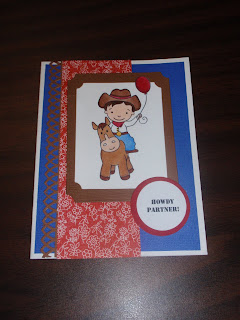
Howdy Partner!

We missed little Ethan's 1st birthday party this past weekend, so I wanted to wish him a Happy Belated Birthday! Their birthday theme was cowboys, so I immediately thought of the Pink Cat Studio Ethan digi! How perfect is that? I just love this digi but rarely use it since I don't know many people who are cowboys. Since that was his baby theme too, I wasn't going to give up this chance to use my digi.
Not sure if you notice but I cut out the balloon he's holding. I like that effect a lot and need to remember to use it more often. Sorry, I don't recall what company the DP is from since it was a scrap.
Supplies: Ethan digi- Pink Cat Studio Cardstock- Bazzil DP- ??? Scrap Howdy Partner sentiment- printed from computer Rectangle dies- Spellbinders circle punch- Paper shapers and Marvy Arch border punch- Martha Stewart

Tuesday, October 27, 2009

Two Minds Think Alike!

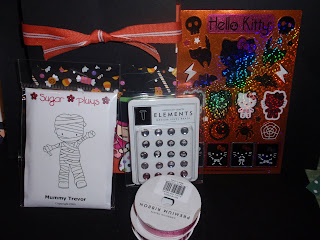
Enjoli of Stampin Under The Sun blog sent me this cute RAK today. I did her a favor and sent her some stuff from this side of the island and included a Princess Anya dressed as a witch slider card with the package. After she got my package, she emailed me to tell me that we must be on the same wavelength and that I'd understand after I got her package. I cracked up because we came up with the same idea of using Princess Anya as a witch. We even used the same Sizzix Witch hat die! LOL! Even though I've never met Enjoli in real life, I'm pretty sure I'm gonna like her. We are two minds that think alike! hee hee hee.
I just love this box. I need to figure out how she made it. It looks very simple, so I'm sure it wasn't that difficut to make. I love how the ribbon holds the box close. Love her pink hair too!
Look at all the goodies she included inside! I just LOOOVE those Hello Kitty Halloween stickers. Need to find out where she got them from.... I am a hoarder when it comes to stuff I can't find, so I doubt I'll actually use them.. just keep them around to look at and enjoy. Do you do the same? LOL! I also love the CC's Mummy stamp and brads! Again, she sent me these same brads when I won her blog candy and I didn't use any yet because I'm hoarding them! I guess now that I have another package and can unclench my hands and actually use them.
Thank you so much Enjoli for all the goodies! Hope you enjoy your new stamps! Remember to let me know when you visit Hilo!

Monday, October 26, 2009

YNS Card Mingle- Fairy Fhiona

When the YNS Yahoo Group first started up, there was a sign up to participate in a Card Mingle, so I decided to join in the fun. I posted the card I made for Ryann earlier, but here's the card I got from Amy. Amy's on the YNS Design Team.. cute design yah? I love the little accents she put under Fairy Fhiona. Thanks Amy!
Speaking of card swaps, Island Scrapbooking is hosting a Card Drawing (similar to a one card swap), where you visit the store on 11/6 for Craft Night, bring a handmade card, and we'll draw numbers to see who goes home with which card! Sound like fun? Hope you can join us that night starting at 5pm.
I'll be posting my OCS hosted by Teri soon. My partner was Michelle of Mushi's Creative Inspiration. I got her card already, but only sent out her card today! You should be getting it soon Michelle! Thanks for being so patient.

Sunday, October 25, 2009

Two Scoops Rice Make 'N Take

Happy Sunday Everyone! I am headed to Ben Franklin today to take my daughter and her BFF to their Halloween make 'n takes. I'm sure it will be fun for both of them- and me too.
I forgot to post this earlier... this is the make 'n take that I did last week at Island Scrapbooking's Anniversary. We didn't know how many people would come and do the make 'n take, so I only cut about 20 kits. When the doors opened, I had so many customers people peeked in and came back later because it was full. Sorry ladies! Next time we'll plan for more people to join in... maybe we need have a bigger table too!
So I decided to use the Sizzix XL Scallop Bag die. It was funny to hear most of the customers say that they actually had that die at home but never made it yet! Hopefully this will inspire them to use it more. I also decided to use a stamp from one of the Two Scoops Rice sets since they were new to the store. They were so popular that the sets sold out immediately! Who can resist them? I couldn't... they are so cute!
Supplies:
Fairy baby stamp- Two scoops rice
Circle punch- Paper shapers
Scallop Circle- Quickutz
DP- Bo Bunny
Cardstock- Bazzil
Ribbon
Scallop Bag die- Sizzix
Markers- Copics

Saturday, October 24, 2009

Nice RAK!

I think the term RAK is so funny. I like the meaning, its just when you say it it sounds like something else. (giggle giggle)
Anyway, just wanted to say THANK YOU to Denise of Denise Loves Stamps! She sent me this cute card using Himawari Babies... and look at all the Himawari Babies she included! Thank you Denise, that was so sweet of you to send me all these images! Since they are already colored, it makes cardmaking so easy!
Next, I wanted to thank Lorna from Stickernut Stamps. She had a blog candy giveaway earlier this month and even though I didn't win, she still sent me something. How nice yah? Unfortunately I forgot to take a photo of all the goodies she sent me, but I still wanted to thank her for giving the "losers" something too! :) It was nice to see Lorna again at the Island Scrapbooking Anniversary Sale last Saturday. I was hoping to catch her at the Pumpkin Patch in Waimea, but there was just too many people there. Hope to see you again soon Lorna! Let me know when you are coming to Hilo so we can meet up.
I have some other stuff to post, just have been so busy working on my class kits for today. Now that I'm done, I can work on other stuff. Yay!

Wednesday, October 21, 2009

Last In The Series

OK, I think this is the last of the Two Scoops Rice series for now.. until I get my new Holiday Two Scoops Rice Stamps!
Here I go using my favorite color combo, pink and brown. I finally picked up some brown satin ribbon that works well on this card.
Do you like her fancy flower earrings? I just love daisies, so I think this is my favorite of the set of 3.
Supplies:
Fairy stamp- Two Scoops Rice
Cardstock- Bazzil
DP- Pebbles Inc.
Lace border punch- Martha Stewart
Ribbon
Friend stamp- TGF
Crystals- Hero Arts
Markers- Copics
Stickles
Hope you enjoyed this series of Two Scoops Rice designs! Now, don't just sit there reading this! Go get some of these cute stamps from Island Scrapbooking!

Tuesday, October 20, 2009

Snowflake Fairy

Just wanted to use my new Fleur De Lis Spellbinders die that I've wanted forever and finally got last week! I've seen so many beautiful creations using this die, that I just had to have it.
I'm actually using it in one of my classes this month and had a couple of extras cut, so I decided to make a card using them. I like the look of doubling them up so that it looks like a snowflake. The ice skating fairy from Two Scoops Rice was added to the center as the focal point.
I didn't want to have a busy background that would take away from the snowflake, so I decided to just mat it and add a little texture using my Sizzix embossing folder. I was determined to figure out how to get the texture on the entire piece of cardstock since my cardstock was larger than an A2 size. I FINALLY figured it out! Yipee! Yay, I finally solved the mystery. If you want to know how its done, leave me a comment. I'm thinking I'm the last person on the planet to figure out how to do this, so in case I'm not and you want to know how I did it, let me know and I'll post the instructions.
Supplies:
Ice Skating Fairy- Two Scoops Rice
Markers- Copics
Fleur De Lis pendant- Spellbinders
Dots embossing folder- Sizzix
Cardstock- Bazzil
Stickles
Ribbon
Glitter paper- Doodlebug

Peek A Boo!

Here's another Two Scoops Rice creation... Doesn't it look like the bug is playing peek a boo? It reminds me of playing hide and seek with my daughter.
Supplies:
Bug stamp- Two Scoops Rice
DP- K & Co.
Ribbon
Markers- Copics
Hello Stamp- TGF
Circle & Scallop circle- Spellbinders and Paper shapers

Monday, October 19, 2009

Nutshells Challenge

Hi Everyone,
Just wanted to pop in to post this card for the Nutshells Challenge. I hope I make the deadline, if not, oh well. In Hawaii, its still 10/19, so hopefully it still counts.
The challenge was to use this digi that you can get for free on their blog. I think her name is pecan pie or praline or something yummy sounding. Anyway, since she was supposed to be flying, I had to make her fly, right?
You can't tell from my junk photos, but I suspended her from the top of the circle so that there is some movement. I turned off my flash in this photo so you could see that the image was raised. You can also see that the bats are fluttering next to her.
I also used the MS spiderweb punch (my favorite) and attempted to make a full web border. It came out better than I expected. I cut a 1" strip of black cardstock and punched one side of the strip, then turned it around and did the other side.
Check out Nutshell's challenge here..
Supplies:
Pecan Nut digi- Nutcrafters
Circle punch- Marvy
Cardstock- Bazzil
Spiderweb punch- MS
Flying by sentiment- Hero Arts
Bat punch- MS
Markers- Copics

Smile!

Here's another fairy from Two Scoops Rice... Guess I'm on a Two Scoops Rice roll. Decided to keep all of these cards very simple so you can focus on the image. Since its now Autumn, I decided to use some fall colors. Maybe she's an Autumn Fairy...
Maybe I should have drawn a smile on her face yah?
Supplies:
Fairy stamp- Two Scoops Rice
Smile stamp- TGF
Ribbon
Lace punch- Martha Stewart
DP- Bo Bunny
Cardstock- Bazzil
Stickles
Markers- Copics
Dew Drops- Robin's Nest

Sunday, October 18, 2009

Shhhh, Don't Wake The Baby...

Island Scrapbooking is now bringing in Two Scoops Rice! Woo Hoo! They sure have some cute stamps... I just can't resist! To celebrate, I decided to make a card using some stamps I already had. This is one of my fave's... Reminds me of a sleeping baby.
I'm really liking this color combo!
Supplies:
Baby fairy- Two Scoops Rice
Markers- Copics
DP- TPC
Circle and Scallop Circle- Spellbinders
Flowers- Prima
Ribbon
Cardstock- Bazzil
Stickles

Saturday, October 17, 2009

Two Birds With One Stone (or should I say Card?)

Now that Island Scrapbooking is carrying Your Next Stamp, I decided to make a sample for the store and enter into the first YNS challenge! I chose Rainy Day Fhiona since she was wearing a rain coat, which I immediately thought I should color yellow. It reminds me of the JPO's at my elementary school. It never rained that hard in Kailua, but for some reason, they always wore those yellow rain jackets... Now Hilo JPO's I could understand, but not in Kailua...
I thought long and hard about how to make it look like it was raining on the card... I finally came up with using my stickles on acetate and streaked the drops to make them look like rain. I think it came out pretty good. Its really hard to tell from these photos, but when you see it in person, it looks like it's raining on Fhiona.
The fun part about this particular challenge is that there will be a winner picked, AND you can also win a stamp just by entering (random person will be drawn)! So even if you are not confident you can compete with the experts, there's still a chance you could win something... Might as well enter, right?

Phew!

Wow, what a day! It was a crazy, fun filled sale day at Island Scrapbooking. Boy am I pooped! We had alot of fun, doing make 'n takes, games, eating, coloring, laughing, and just plain having fun! It was nice to see everyone enjoying themselves so much, some even came back in the afternoon to do the 2nd make 'n take that Debi did! Some just chose to hang out all day! We had several customers present at a number of the hourly drawings.
OK, I know I'm such a bone head for not taking a photo of my make 'n take! Duh! I'll go back to the store and take a photo later. Sorry! In the meantime, here's Debi's make 'n take.... She did her cute popsicle card! Later on, Carol dropped off some small popsicle sticks and Debi quickly went to work on the smaller version! I didn't get a chance to make the smaller one, but here's the prototype Debi made. She's so awesome!
Thanks to everyone who came to celebrate! It wouldn't have been as much fun hanging out at the store all day if no one showed up!
A special thanks to my daughter Akemi for working so hard yesterday helping us get ready for the sale! She kept herself busy making these cool cards using punches. We "cased" the spider from Teri's blog, but came up with a few more animals using the same punches... Thanks for the idea Teri! My daughter had a blast and decided she wanted to teach her grandma how to make some too!
She decided the spider needed a nose and a hat...
Here she tried makign a flower... do you like her eyelashes? She must've made it a girl, because all her girls have eyelashes...
Here's her jellyfish.... She wanted to write Have a Jellin day. Not sure what that means but it sure is cute!
Finally, I liked her octopus so much, I decided to make a card using it. Since Island Scrapbooking now carries these new phrases in laser cuts, I decided to use the Happy Birthday sentiment. DP is by Doodlbug, I thought it was the perfect match!
I'll be posting more photos of the anniversary sale on the Island Scrapbooking blog, so check it out soon (not now, I'm too tired!)... Going to go to bed now.

6th Anniversary Sale at Island Scrapbooking Today!

Hi Everyone! I've been helping Michele at Island Scrapbooking get ready for her big 6th Anniversary Sale today. Come and visit me in the morning for a Make 'n Take goodie bag using some of her new products. There will also be fun games, prize drawings, unreal in-store specials, and other fun stuff. For more information, check out the Island Scrapbooking blog for more details. Dont' forget to stop by my Make 'N Take and say hi!

Wednesday, October 14, 2009

Are You Sick Of This One Yet?

Yes, I like this Fhiona stamp for the penny spinner card. I like it so much that I've done this same design several times now! Anyway, since the penny spinner card is pretty simple, I decided to teach this card to my club. They were thrilled to learn this technique! Pictured here are the samples I made (one as the sample, one as the demo).
OK- I promise... no more of this card to be posted, even if I made 100 more! LOL!
Supplies:
Yippee Fhiona- Your Next Stamp
Happy Birthday sentiment- Sizzix
Word window punch- Stampin Up
DP- Doodlebug, American Crafts
Pop dots
Pennies
Copic markers