Showing posts with label Christmas. Show all posts

Thursday, November 20, 2014

More Craft Fair Project Shares

I'm back with more project shares...  I have some of these left to sell on Saturday's craft fair at my house.  Yay!

These are very popular for giving to little children.. Its a mini mailbox to be used to leave your letter to Santa on Christmas Eve.  I decorated each Target mailbox (you have to raid their stash in the dollar bin around Valentines day) and then glued it to the glass candlestick.  Then I added a Mama Elephant Santa and some Island Scrapbooking laser cuts.  On the door, I added a decorative bow and inside there is some candy for the recipient. I'm so excited to make these this year!  The 4 I made last year completely sold out so quickly that I was glad to have more available this year.  I have to remember to save one for Akemi!


Another brain child I came up with this year is altered lunch bags I found at the target dollar bin.  I'm telling you, the target dollar bin is a gold mine for crafters!  I made all the flowers that were attached to the bags and they have been selling pretty good so far. I only have a few left from last weekend and will be making a few more with the stock I have on hand for this weekend.


Here's some altered bags I made originally for my daughter's birthday party last summer.  All of her friends loved them!  So I decided to make some for the craft fair this year. 


More altered canvas bags I made for the fair...


Hmmm, not sure why the thumbnail is not working here... Anyway this video features my altered mirrored compacts and teacher gift sets I made this year...  Teacher gift sets always seem to sell so well here. I think parents with young children are always looking for gifts for teachers at Christmas.


I still have calendars to show here too... will post those shortly.  See ya soon!

Wednesday, November 19, 2014

Craft Fair Projects

Hi Everyone!

Just finished up a craft fair last weekend at the Manono Marketplace and sold out of quite a few items... but I thought I'd share them here with you anyway, please check out my videos below. I'm making more of some of these and may have some available at my craft fair this Saturday (at my house).

Here's my manicure sets in altered burlap bags... Ran out of this sized bag, so I'm making more in mason jars...


These were some clip containers that I made too. These surprisingly sold out!


Made these stationary bag sets and paper clip jars... paper clip jars all sold out but I still have some of the stationary bag sets available for Saturday.


Insulated cups filled with candy...  These sold out so quickly!  I guess its a great gift idea!


I've decided that this is my last year for craft fairs, so please stop by on Saturday or on 12/6 at Island Scrapbooking to say hi!  I just need to take more time for myself and my family.  Thank you for all your support over the years!  I'll be posting more projects soon...

Monday, October 28, 2013

Christmas Tags Class

Every year, I normally teach a Christmas class of some sorts.  Sometimes I do a whole series of Christmas classes and sometimes it's just one class.  This year, I was only able to do two classes but they were a total of 12 different tags.  I still need to take photos from the first tag class, but I managed to remember to take photos from today's class.

Here's a pix of the 6 we did today...


This first tag was on my mind for quite some time.. I guess you could say it was the inspiration of the class!  Although not illustrated here, you can tie the ends of the banner to a gift bag and let it hang.  You can make it larger or smaller by adding more banners. I used an EK success triangle punch, but there are several companies that make banner punches or dies now.  The letters shown here are by PTI, but in class we used the alphabet dies by Lawn Fawn.  Background paper is by Doodlebug.


This second tag was a last minute change from what was originally submitted.  I really wanted to introduce Inka Gold to the class to see if they liked it. They had a great time trying out the new product and looking at all the color options.  All of the snowflakes were old Martha Stewart punches.  The snowflake border is a memory box die. Added some crystals for embellishments and more bling.


This next tag was the last tag I worked on.  I stayed up pretty late and made more modifications this morning until I was satisfied with it.  Decided to use the new Mama Elephant stamps.  So happy the store now carries Mama Elephant!  I've been waiting for this set for almost a year!  Used the polariod stamp from an old Lawn Fawn set as the base of the tag.  Then aligned the deer from Mama Elephant and speech bubble from Lawn Fawn and stamped it together.  Then stamped the No Peeking sentiment that is also part of the Mama Elephant set.  The Merry Christmas sentiment is by Island Scrapbooking and fits perfectly on the bottom of the polaroid.  Topped it off with a bow.


I think this is my favorite tag of the set.  This was inspired by the cupcake picks you see all over the internet.  By using a BBQ skewer, you can stick the stick into any gift bag and let it pop out!  Love it!  I cut up the flags using a 2 1/2" x 7" strip of Doodlebug paper.  Then folded it around the skewere and taped it together.  You flag will look like a rectangle, but then you cut the points to make it look like a banner.  You can adjust the size of your flag depending on what you want to put on it, but I think this size came out pretty good for a gift bag.  The Santa was actually punched from the back of the scrap paper of the flag.  I used a 1" punch to punch out Santa and then a 1 1/4" white circle behind it.  Finally mounted both on a 1 3/4" scallop circle.

To secure the ribbon/baker's twine so that it doesn't keep falling off, I punched a tiny hole next to the stick on the top of the flag.  Then threaded the ribbon/baker's twine through it before tying a bow.


One of the other tags I wanted to do included a clothes pin.  I thought it would be fun to use the clothespin as an accessory to the tag, but it can also be functional to clip the tag to your gift!

Used a Memory Box tag die as the base out of kraft cardstock.  The holly border die is also by Memory Box- can you tell it's one of my favorite die companies?

The sentiment was from a Paper Smooches set, which was embossed in white to look like icing.  The mini gingerbread man is another Island Scrapbooking laser cut. Topped it off with some red pearls to look like the holly berries.

The clothespin was made by covering each side with 1/4" strip of designer paper. Then I punched a heart using an old Martha Stewart punch and added PTI button and tiny bow.  I thought this would be cute to put on some baked goods for my neighbors or work place.


My last tag was made using the envelope punch board.  If you haven't picked this up yet, you need to.  There are so many amazing projects circulating out there and new ideas are cropping up every day!  I'm amazed how much this new tool has changed how we make paper projects!

This project was inspired by the mini treat holder that is circulating on the internet.  It's meant to hold a mini candy bar and many people are using it for Halloween projects.  Since we often give candy canes at Christmas, I thought I'd adjust it a bit to fit a candy cane or money that you can then hang from a gift bag.

The dimensions are 7 1/2" x 7 1/2" cardstock and punch/score starting at the 2 5/8" mark. Then rotate and line up with the score guide and punch/score again.  After adhering it down, you will get something that looks like this.


I used the Season's Tweeting's stamp set by Lawn Fawn, a Spellbinders heart die and the Memory Box branch die to decorate.

We had a great time in class!  Need to finish up one more class next Saturday then its craft fair prep time!

Friday, October 19, 2012

Attention Hilo Peeps!

It's almost here!  Tomorrow you can find me (and my friend Susan) at the first annual Waiakea Intermediate School Pumpkin Patch event!  There will be food, games, crafts, entertainment, and pumpkins (of course!).  The event starts at 9:00am and runs through 2:00pm.  The craft and food booths will be located around the library, which is located right behind the main office.  

The front lawn will house all the entertainment and the pumpkin patch.  I hear they will also have a petting zoo too, so Hilo folks- bring your family for day full of fun!

I've been busy trying to make some things before the fair.  Here's a sampling of what you can find at my booth. We will also have some fun treats for sale- just in time for Halloween!  Here's what I've been busy working on....

First up is my snowflake ornaments!  I made them in several pastel colors. I love snowflakes and was so happy to find the tutorial on youtube by CynthiaLooWho.


You may remember that I made my friends Linda and Cami  an easel message board/earring holder?  Well, I  modified it a bit based on these frames I found at Walmart.  They were perfect since it didn't contain any glass or acetate.  Now why would someone want an unfinished frame like that?  I guess I did!  Worked out great for me!


Here's the coasters I thought I'd try out.  Just cut up some of my precious washi paper and decoupaged it onto the tiles.  Also added some cork for the bottoms so it won't scratch your table.  Selling them in a set of 4.


Another fun project that I enjoyed making was this mini watering can pin cushion. I added in some of the stickpins I've been working on.  Had to give it a shabby chic touch by adding some beaded trim.


So if you have some time tomorrow- please stop by and say hi!

Tuesday, August 28, 2012

Stamp Camp #3- Coming Soon

Still trying to catch my breath from a couple of crazy weekends, trips home, and getting ready for Sister Stamps Release #9.  In between all the chaos, I managed to make a class sample for an upcoming class I'll be teaching with Debi.. on Saturday, Sept 8th all day.  You've seen this same birdcage ornament I made earlier in a shabby chic theme.  Decided to go with more traditional Christmas colors this time, so I had to change up some of the supplies.  Ended up using some DP with no words, so I stamped them myself using an old Hero Arts background stamp.  I liked the look of the last paper I used, but the background was aqua, so I went with something that was more neutral. 


Cut the birdy up using red cardstock and stamped his breast using another old Hero Arts heart flourish clear stamp in gold.  Inside the cage, I cut a pinecone using my Tim Holtz tattered pinecone die (finally!)  I totally missed the season last year and bought it in February.  I was happy to get it but never used it till now.  I know you can't tell from the photo but I used gold smooch on the edges and added some gold stickles.  Other goodies in the cage include a pine branch and berries.  I'm thinking of adding an ornament too.  Oh.. almost forgot!  I also put some glue on the bottom of the cage before I put the other goodies down.  Over the glue I added a layer of white flower soft to look like snow. I've ALWAYS wanted to use my white flower soft as snow and I'm finally doing it!  Added some red ribbon to the top to close up the top of the cage.  Topped it off with some double row mesh bling.  It's Christmas after all, so gotta have some bling right?


I think this class might fill up fast, so hurry and sign up if you want to save your spot.  Don't forget to check out the Sister Stamps blog for a chance to win our new images!

Thursday, August 16, 2012

Tim Holtz Birdcage Ornament

Yes, yes... more shabby goodness today!  I was trying to figure out what projects to make for the next Stamp Camp (we are on #3 already!)  Debi and I decided to do a Christmas theme for the next class.  For the past 2 years, I've been doing Christmas themed classes in the second half of the year, but I've been so busy this year, I haven't been able to plan that many Christmas projects.  So I asked Debi if she wanted to do a Christmas themed Stamp Camp to satisfy the "regulars" that were asking for Christmas.  She loved the idea, so we've been trying to brainstorm what we are going to teach.

I've been getting a lot of inspiration from You Tube recently- looking for more shabby inspiration.  And I stumbled upon several tutorials on how to make a 3-D bridcage using the Tim Holtz Sizzix die.  I loved the results I saw, so I tried to make one to see if it was feasible for our class.  I think it took me awhile, only because I was trying to figure out how to decorate it. The actual construction wasn't that bad.  Here's the link to the tutorial I used to make this one, but there are several different tutorials out there.

On to my project... So I cut 4 of the Tim Holtz bird cage die out of this old paper from my stash.  I wanted it to have that shabby look, so I chose to use the side with the script writing on cream. The other side was a nice aqua color, which goes with my shabby chicness!  Perfecto!  I guess you need to keep the backside of the cardstock you are planning on using in mind since it will show.


I decorated the outside of the birdcage using some Tim Holtz ribbon trim.  It had an elastic ruffle, so I glued on some pearl trim to cover the elastic.  Then I glued on some roses by Wild Orchid Crafts along the bottom of the cage.


On the top of the cage, I used the Tim Holtz seambinding and inked it up using my Spun Sugar Distress ink pad.  I went direct to ribbon using the pad.  I thought I had the Spun Sugar stain, but I guess I don't.  Guess I'd better add that to my wish list!  The color matched perfectly!


Now, I don't know if you can see this, but I wanted to take a pix of the inside of the cage.  I added some roses to the cage floor then stuck the bird (also from the same die) into the roses, which helped the bird to stay up.  I added some glitter to the bird's breast and wing so you could see the difference even though I was using the same colors. I think next time I'll add some pearls to the bottom of the cage too.


I am liking this birdcage idea!  I wonder if TH had that in mind when he made it or if his followers just came up with a great idea!  I really don't know who came up with this brain child, but it was pretty ingenious!

I need to tweak it a bit since I don't know about the whole shabby chic look for the class.  If I come up with a newer version, I 'll share it here.

Thursday, January 5, 2012

Inspired

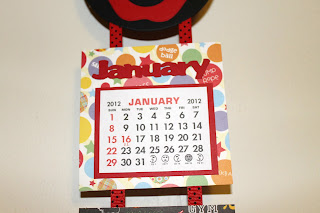
One of my friends who participated in my craft fair- Jen, also made calendars this year. This time she made these cute wall calendars. Since they were Sister Stamps, I snatched them up without knowing who to buy them for! Then I remembered that we didn't get anything for Akemi's Sensei's, and I knew these would be perfect! Since Jen only had 2 left and I needed 3, I had to make one more. I wanted each teacher to have the same thing, so I copied her design- thanks Jen for the inspiration! Here's what I came up with.. Such a fast and fun project!

Tuesday, January 3, 2012

Teacher Gift

Happy New Year! I know, it's been awhile since my last post. I've been away for a bit taking care of some family business, but I'm back now and wanted to share a few more projects that I worked on for Christmas. Every year, I make Akemi's teacher a calendar for Christmas. I was sorta hoping that I'd have some leftovers from my craft fair, but I didn't, so I had to whip this one up at the very last minute. I mean I did this calendar the night before her last day of school before winter break! Talk about procrastination! Anyway, luckily had had leftover DCWV school stack (4x6 size) paper left, so it didn't take long to choose the papers I wanted to use. Since I kept everything simple this year, it didn't take long to put it together... until I came to the top of the calendar... Hmmmm.... had a hard time figuring out what I was going to do. Think, think, think... what do you think of when you think of teachers or school? Apples of course! Since my last episode with my cricut was still fresh in my mind, I decided to use my handy dandy spellbinder dies instead. Found my old apple set and cut out this apple. Then I make it kawaii-style by adding in a cute face. I couldn't resist making it have a big 'ol smile! Scroll down for the rest of the calendar... I hope Akemi's teacher liked it! Be back soon with more teacher gifts.

Wednesday, December 7, 2011

More Gift Card Boxes

A surprise seller were these gift card boxes. When you open up the box, there's a place for your gift card, so its all ready to go! I love that these were so easy to make too and wish I made more now in retrospect. I'll have to stock up on these for future craft fairs. Here's the Christmas versions... And more all occasion ones..

Saturday, October 15, 2011

Giddy Up!

I know all of you have been eyeing up these stocking turned horsey creations in blogland right? Well, I didn't have that Stampin Up sizzix die at the time I made this fella, so I used the largest stocking die from my Lifestyle crafts set and it worked out nicely. Added some yarn for his hair- just used very strong double stick tape to adhere it down and then slapped on the other half of the horse to keep it in place. The harness was done using ribbon and a mini brad. Eyes were just punched using 3/4" and 1/2" circle punches and the ears were made using my MS heart punch that I folded in half on the wide end and taped it together so that the pointy side was still a little open. He reminded me of those toy horse on a stick that kids play with, so I put him on a candy stick bag filled with pixie sticks. Let me tell ya, pixie sticks are way smaller than before! Look how short the stick is! If you are making this project, you might want to stick with regular m&m's instead since you can make it taller if needed. It's raining today in Hilo, which I would normally love on a Saturday (so I can stay home and craft) but I have class today, so not looking forward to getting wet! I know you are thinking... Hello, its Hilo! It always rains! ha ha ha.

Tuesday, October 4, 2011

Holiday Tags!

As you can see I've been a busy busy girl! Here's one of the classes in my crazy schedule coming up in November. I already shared the snowman with you, but here's the rest. Needed to keep them rather simple since we'll be making a bunch. Also got a fun bonus project planned that I'll share with you after the class so that its a surprise for the students. This tag is very simple- its from the new clear tags set by Hero Arts. After several versions, finally decided on simple embossing in gold. Here's another simple tag... embossed it again in white on kraft and added the punched pointsetta accent. Oh- here's one of my faves... Santa peeking over the tag. Tag is just a spellbinder die folded in half. Santa is made with punches and mittens are from the Spellbinder mitten set. And finally, found my old gingerbread punch and stuck him in this stocking. Gave him a face using my white enamel (used black on Santa's eyes). Oh yes, added pine branches (MS punch) and dew drops for berries. Hope you can join us for this fun class! If now, hopefully this will inspire you to start on your holiday tags.

Thursday, September 29, 2011

Telescoping Snowman

While perusing through the Splitcoast Stampers gallery, I stumbled upon some fun telescoping cards! I knew I had use this technique in one of my upcoming classes, so I searched for good ideas and decided on the telescoping snowman! Awhile back I had bought this snowman face stamp by Dandelion Designs thinking I would need it one day. It came in very handy and was the perfect size for my project! Here he is all bundled up. I like to think of it as looking down at him... And here's what he looks like when he's open! I know I gotta change those brads to white, but I couldn't wait to show him to you, so I just left it gold. This is such a quick and simple card to make and the perfect size for a Christmas tag! I'll be back soon to share the rest of my tag projects for this class. Oh, and did you remember to check out the Sister Stamps blog for all of our blog candy and Debi's blog for more candy? If you haven't already done so, start here... and post on all introductory posts... then check out Debi's blog for Release #3 posts for more chances to win. Oh yes, and don't forget to like Sister Stamps on facebook- you just might be surprised with more candy!

Tuesday, September 13, 2011

Happy Winter!

Did I tell you how much I'm loving Lawn Fawn? Their stamps just make me happy... especially the new releases! Couldn't wait to get my hands on those cuties. Making Frosty Friends was one that I knew I had to have. I didn't think that I would use it in a stamp layering class though... But as I sat and stared at my messy desk and stamps, I started to visualize what I wanted to do and here's the end result... I love how this came out! So simple too. This Lawn Fawn set actually comes with all the accessories for your snowman too! I can't wait to play with them more. Well, that's the last of my class samples. Hope you enjoyed it! Supplies:
  • Snowmen, snowflakes and sentiment stamps- Lawn Fawn
  • Snow background stamp- Hero Arts
  • pearl mica powder
  • cardstock- Bazzil

Monday, September 12, 2011

Season's Greetings

This is actually the first card I came up with for my Christmas stamp layering class. I had seen something similar on the Splitcoast Stampers gallery and put my own spin on it using the layering technique. I think my favorite way to layer is using word background stamps. So simple yah? For your Hilo bloggers out there, if you would like to sign up for this class, please contact Island Scrapbooking. This class was just added and was not advertised through the newsletter. Supplies:
  • Cardstock- Bazzil
  • All stamps-Hero Arts
  • gold twine

Saturday, September 10, 2011

Christmas Stamp Layering Class

Gee, its been awhile since i last made a non-Sister Stamps card! Planning my next Christmas Card class and wanted to incorporate the stamp layering technique- its like taking 2 classes in one. I had a few people ask me to offer the stamp layering class again, so I thought why not combine the two? Here's one of three cards we will make in the class. I decided to try layering on DP instead of just my usual white cardstock. I like to show versatility whenever I teach a technique to show students how to apply what they've learned to make different types of cards. Since the cardstock was already colored, I didn't have to worry about adding in distress ink to the background. Instead I decided to use my favorite music notes background stamp (Hero Arts cling) with versamark and then add my other favorite- gold mica powder to it. Sorry- camera still not working great, but I think this photo kinda captured the gold so you can see how it looks in the light. I know you can't tell, but it also says Merry Christmas above the reindeer's head. If you want a better look, you'll have to stop by Island Scrapbooking. Hopefully I can pick up a new camera soon. I'll post the other two cards I came up with soon. Thanks for stopping by! Oh yah- for those of you who inquired about where we went to eat dim sum... I wonder if I should tell you? Then it might get too crowded for us to enjoy when we go visit!! Nah- only kidding. We ate at Royal Garden at the Ala Moana Hotel. Super yummy! Where is your favorite dim sum place to eat? Supplies:
  • All stamps- Hero Arts
  • Corner punch- Martha Stewart Crafts
  • crystals- Kaisercraft
  • Mica powder
  • versamark